OBF > Creator tools
Badges created with Open Badge Factory fully comply with the Open Badge 3.0 standard, developed and maintained by the 1EdTech Consortium, ensuring their interoperability, verifiability, and global recognition.
How to create a new badge?
Create a new badge by clicking the empty badge icon with the text Create new badge.
A new view will open where the badge creator can fill out the badge’s information (1. Content), write an e-mail message to badge earners (2. Message), define additional settings (3. Issuing), and ask for endorsements (4. Endorsements).
NB! Section 4. Endorsements will be visible only when the organisation has one or more partners in Network area.

1. Content
Information regarding the badge will be saved, and the metadata will be “baked” to the badge with this form. The information will be shown to the badge earner and consumer.
Image
The most visible part of the badge is the image attached to it, and it is uploaded either:
- From the badge creator’s computer: Upload a file (PNG or SVG) or
- Pick from library if images have already been saved there.
The picture needs to be:
- PNG (recommended format) or SVG
- Square, we recommend 200 x 200 px images
- Under 250 kB in file size.
3. If there is not a ready-made image, the image can be created with the badge editor (see Image Library - Creating an image with editor section)
The image is compulsory and needs to be uploaded at the latest when the badge is saved.
Language
A badge can be created with one or more languages. From the Add language menu, the badge creator can add a language/languages that will be shown both to the badge earner and consumer.
The language chosen first will become the default language, but it is possible to change the default language later when more languages have been added.
The fields that will be filled out with additional languages are name, description and criteria if the badge is made multilingual. Please note that the badge image will remain the same in all language versions.
It is possible to examine different language versions by clicking the Preview button below the image.
NB! If the badge is created with several languages, it is good to finish with all language versions first and then issue the first badges. If languages are later added, new languages won’t be updated to those who have already received the badge.
Name
The name of the badge can be 128 characters long, and it is visible to the badge earner and consumer. Choose a name that describes the badge in the best possible way. This is a compulsory field.
Description
The meaning of badge description is to describe the meaning/content shortly and effectively so that the badge earner and consumer will be interested to study the badge more. 1,000 characters can be used for the description. This is a compulsory field.
Tags
The badge issuer can determine with tags what theme the badge is related to. NB! Tags are different than the Open Badge Factory categories.
Default expiration time
It’s possible to set an expiry date for the badge after which the badge is no longer valid. The badge issuer organisation can create badges that require further education or similar from the badge earner to continue the validity of the badge. The expiry date is given as month/year when creating the badge, but an exact expiry date can be given when issuing the badge.
Additional badge content
To include additional fields compliant with the Open Badge 3.0 standard, you must first enable these options under Admin Tools > Badge Content (see the article “How to enable additional fields in badge content?”). Important note: If these fields are not enabled, they will not be available when creating a badge. If disabled after a badge is created, they will no longer appear in the issued badges.
Achievement types
Achievement types are used to categorize the kind of accomplishment a badge represents. This field is optional but very useful for providing context about what the badge certifies.
The list of available achievement types is defined when additional fields are enabled under Admin Tools > Badge Content.
Once an achievement type is selected, its meaning is displayed below to provide context and clarity.
Credits Available
This indicates the number of credit hours associated with the achievement, or the total possible credit hours. For example, 3.0.
Field of Study
This specifies the category, subject, area of study, discipline, or general branch of knowledge. Examples include Business, Education, Psychology, or Technology.
Code
The code, generally human readable, associated with an achievement. For example, a course code. (achievement field name: Human Code)
Specialization
This is the name given to the focus, concentration, or specific area of study defined in the achievement. Examples include "Entrepreneurship," "Technical Communication," and "Finance."

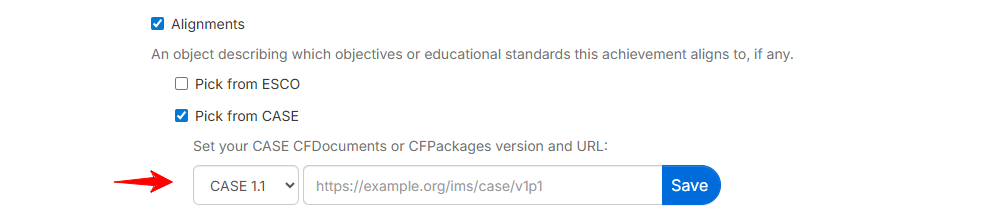
Alignments
It’s possible to add an alignment to the badge that will be shown as a link to the badge earner. NB! Before you can add an alignment, it needs to be added to the environment in Admin tools → Alignments. It’s possible to add an unlimited amount of alignments to the environment.
At the Pro service level, the badge can be aligned with the ESCO framework. ESCO is the multilingual classification of European Skills, Competences, and Occupations. The ESCO classification identifies and categorises skills, competences, and occupations relevant for the EU labour market and education and training.

Pro service level also supports alignment with CASE (Curriculum and Assessment Standards Exchange) referentials, a technical specification maintained by 1EdTech that establishes a standard way to exchange information about academic standards, competencies, and learning outcomes across platforms and applications.
Criteria
One of the most important metadata fields of the Open Badge is the criteria, because that is where it is determined why the badge has been created and on what basis the badge has been issued to the badge earner. It is important for organisations to really think about the criteria of the badges they issue because they set the value of the badge for the earner.
Basically the skills, accomplishments, and learning of the badge earners are being described in the badge criteria. In addition to text, criteria can also contain images and links. It is possible, for example, to point to different sites that compliment or open in more detail the description of the criteria.
A creator can compose the criteria himself/herself, or upload a ready-made criteria template: Pick template.
It is possible to save the composed criteria as a criteria template for later use: Save as template.
Criteria is a compulsory field. The user can save an unfinished badge as a draft, but it is not possible to change the badge as ready for issuing before there is content in the criteria.
Ready for issuing
If the badge is not ready for issuing and the user wants to edit it later, the badge will be saved as a draft (Save and close). In this case, only admins and creators can see the badge in Badge library.
If the badge is completely ready and it can be issued, the Ready for issuing is chosen. After this, the issuers will also be able to see the badge: Issuer tools → Issue badge.
Advertise in Passport
It is possible to advertise badges in Open Badge Passport by clicking the Advertise in Passport link. Tick the Ready for Issuing box to see the advertising link appear in Open Badge Passport. More detailed instructions regarding advertising will be given in the pop-up window that opens after clicking. Organisations will gain more visibility for their badges among badge earners by advertising them.
2. Message
The e-mail message that will be sent to the badge earner when they are issued a badge, will be created with this form. The message consists of two parts: the body of the message and the footer. The link, through which the badge earner can accept the badge issued to them, is located between the body and footer of the message.
Title
E-mail subject.
E-mail body
This is the actual message for the badge earner that usually explains why the message receiver has been issued an Open Badge. The last sentence of the body can be for example: “You can accept the badge by clicking the link below:”
Link text
A link will be automatically added to the message, and by clicking it the badge earner can download the badge. The creator of the badge can set the text that is shown in the link. If the field is left empty, a default text will be added to it: “Get your badge”.
The issuer can add, for example, a link to their website in the footer of the message.
The creator can compose the e-mail message, or upload a ready-made e-mail message template: Pick template. Using templates creates unity in the issuing process of the organisation, and also saves time for the creator and issuer of the badge. Messages are usually very similar to each other, although the badges might be very different.
The creator can save the message as a template for further use by clicking the Save as template link.
It is not compulsory to fill out the Message form, and the creator can leave it empty. In this case, composing the message is the issuer’s responsibility.
3. Issuing
Instructions for issuers
In this field, the creator can save information regarding the badge that is meant for internal use to help out creators and issuers. The creator can tell, for example, who is responsible for creating the content of the badge and for the graphic design, what the use of the badge is, in what connection it is possible to issue the badge, what the connection is between the badge and other badges, etc.
Editing the example questions
The admin user of the environment can edit, add, and delete example questions:
- Click Admin tools from the top menu
- Click Guideline from the left menu
- Remember to click Save when you have finished editing the questions
- Edited questions will be immediately updated to the new badges’ Instructions for issuers field, but the edits won’t affect the texts in the already existing badges’ Instructions for issuers field.
Creator users can edit the example questions in the badge’s Instructions for earners* field when they create a new badge or edit an existing badge. **Instructions for earners field is optional, and it doesn’t have to be filled out or edited.
NB! When your badge is ready for issuing, don't forget to tick the box 'Ready for issue'.
Sub-organisations
If the organisation has the sub-organisation feature in use and sub-organisations have been created, it is possible to choose from the settings the sub-organisations that can issue the badge.
4. Endorsements
Once the badge is ready for issuing, the badge creator can ask for endorsements by clicking the New endorsement link, by writing an endorsement request to the Message field, and by choosing the partners from the partner list that the message will be sent to. NB! The partner/partners need to be added prior to this in the Network area.
Creating a badge at a Pro service level
The process of creating a badge at Pro service level includes an additional step involving the definition of specific rights for badge creators and issuers:
- Content
- Message
- Permissions
- Issuing
- Endorsements
At step 3 'Permissions', it is therefore possible to define:
- Whether all or some of the issuers (sub-organisations and attached persons) can issue the badge,
- Whether all or some of the creators (sub-organisations and attached persons) can edit and modify the badge.
By ticking the ‘Visible in external tools’ box, the badge can be issued from external systems (for example LTI compliant Learning Management Systems).
At step 4 'Issuing', if the box Issued badges can be revalidated is ticked, you enable recipients who have added new evidence to their badge to apply for their badge to be revalidated (and for the evidence added to be validated).
To learn more about badge revalidation, follow this link.
Was this article helpful?
That’s Great!
Thank you for your feedback
Sorry! We couldn't be helpful
Thank you for your feedback
Feedback sent
We appreciate your effort and will try to fix the article