TABLE OF CONTENTS
- About LTI
- Connecting Open Badge Factory to Canvas
- Usage
- Requirements for OBF’s LTI Canvas integration usage
- External Tool placement
- Optional: Add LTI Link to Courses from the teacher’s perspective
- Issuing a badge to course participants manually
- Issuing a badge automatically on course conclusion or score
- Automatic badge issuing default behaviour
- Automatic badge issuing based on score & while the course is active
- Adding badge applications for a course
- Reviewing badge applications
- Issuing history
- Student view
- Badge Issuance Behaviour
- Troubleshooting
About LTI
Learning Tools Interoperability (LTI) is a standard developed by 1EdTech Consortium, which allows courseware and learning tools from different vendors to be launched within a learning platform, often an LMS.
LTI Integration provides a link between an LTI supported LMS and your account in Factory. Our customers can use LTI 1.3 integration with Canvas. LTI integration requires a Pro subscription level. LTI 1.3 has a more straightforward upgrade path than other versions and the full support and endorsement of major platform providers.
Note:
This integration can also be used for the CanCred Factory platform, powered by Open Badge Factory technology. Simply use the host name factory.cancred.ca instead of openbadgefactory.com
Integration highlights
- Issue badges manually, automatically and with badge applications from Canvas
- Badges can be issued to all course participants automatically after the course has concluded
- Badges can be issued based on the student’s final score on the course.
- With the final score, badges can be granted when the course is still active
- Add badge applications to the course
- Review badge applications in the course
- Enable OBF integration to show in the Course Navigation globally, or let teachers and admins determine which courses and modules show the OBF integration
Connecting Open Badge Factory to Canvas
Requirements for integration
OBF’s Canvas LTI integration is an External Tool described in Canvas developer documents.
Performing steps 1-4 require Canvas Account Admin role and OBF Pro account admin access.
Step 5 can be done by users with lesser rights, but
- Users have to be able to create Canvas module items (like teachers by default)
- Link Selection placement has to be enabled in step 1.
Step 1: Create LTI 1.3 Developer Key
How do I configure an LTI key for an account? - Instructure Community
In OBF with a Pro account
Log in to OBF and go to Admin Tools > LTI. Choose Version: 1.3 and LMS: Canvas.
In this page, you can see the configuration values you need to connect the tool to Canvas.
In Canvas as Account Admin
- In Canvas, click Admin > your account > Developer Keys and click "+ Developer Key".
- Select "+ LTI Key" option.
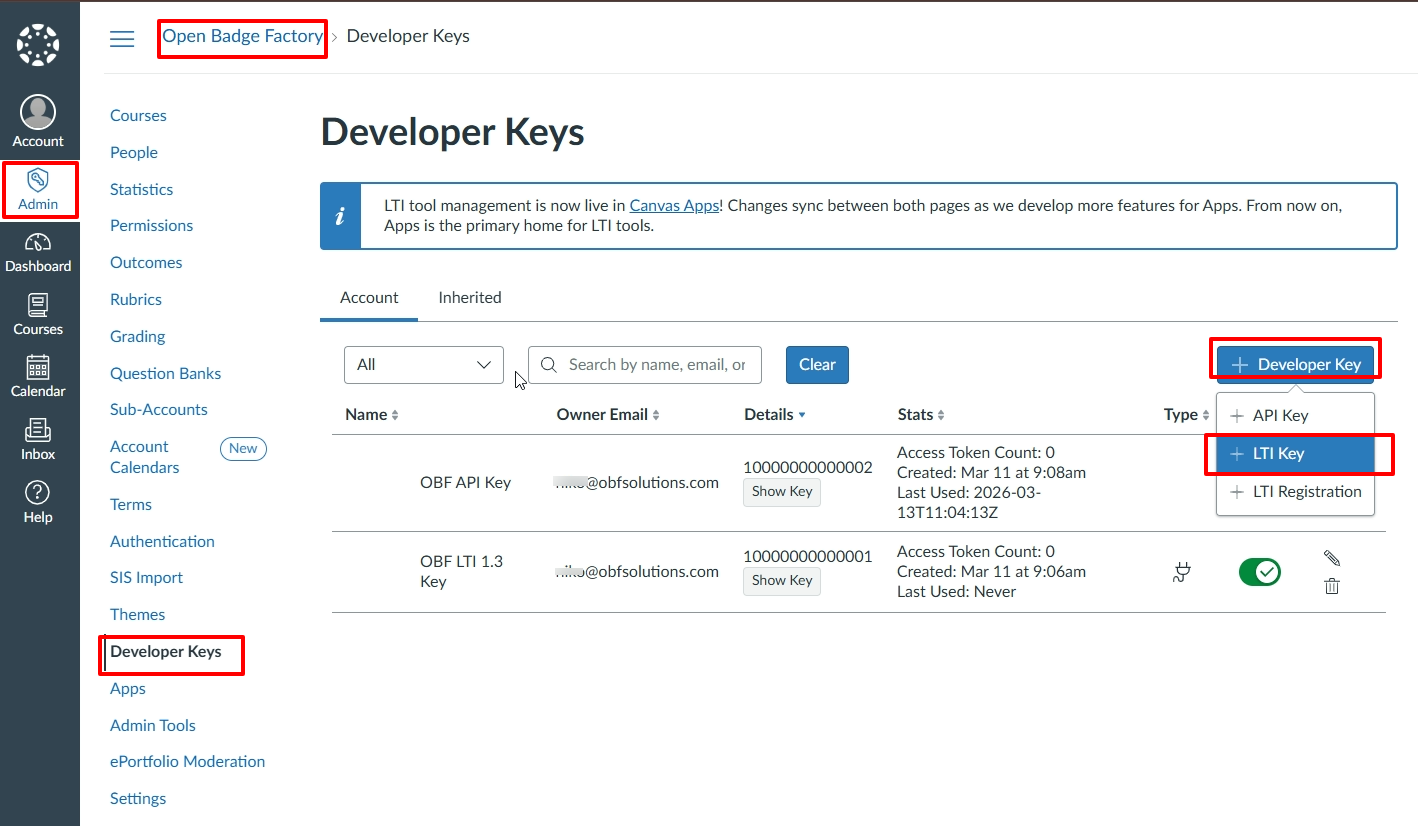
- Choose Method: Manual Entry
- Choose JWK Method: Public JWK URL
- Input descriptive values to following fields:
- Key Name (e.g. "OBF LTI 1.3 Key")
- Owner Email (e.g. your admin email)
- Title (e.g. "Open Badge Factory")
- Description
Copy from OBF to Canvas
- From OBF, copy the following values to Canvas settings form:
- Tool Launch URL / Redirect URL => Redirect URIs
- Tool Launch URL / Redirect URL => Target Link URI
- Tool OIDC Login Initiation URL => OpenID Connect Initiation Url
- Public keyset URL => Public JWK URL
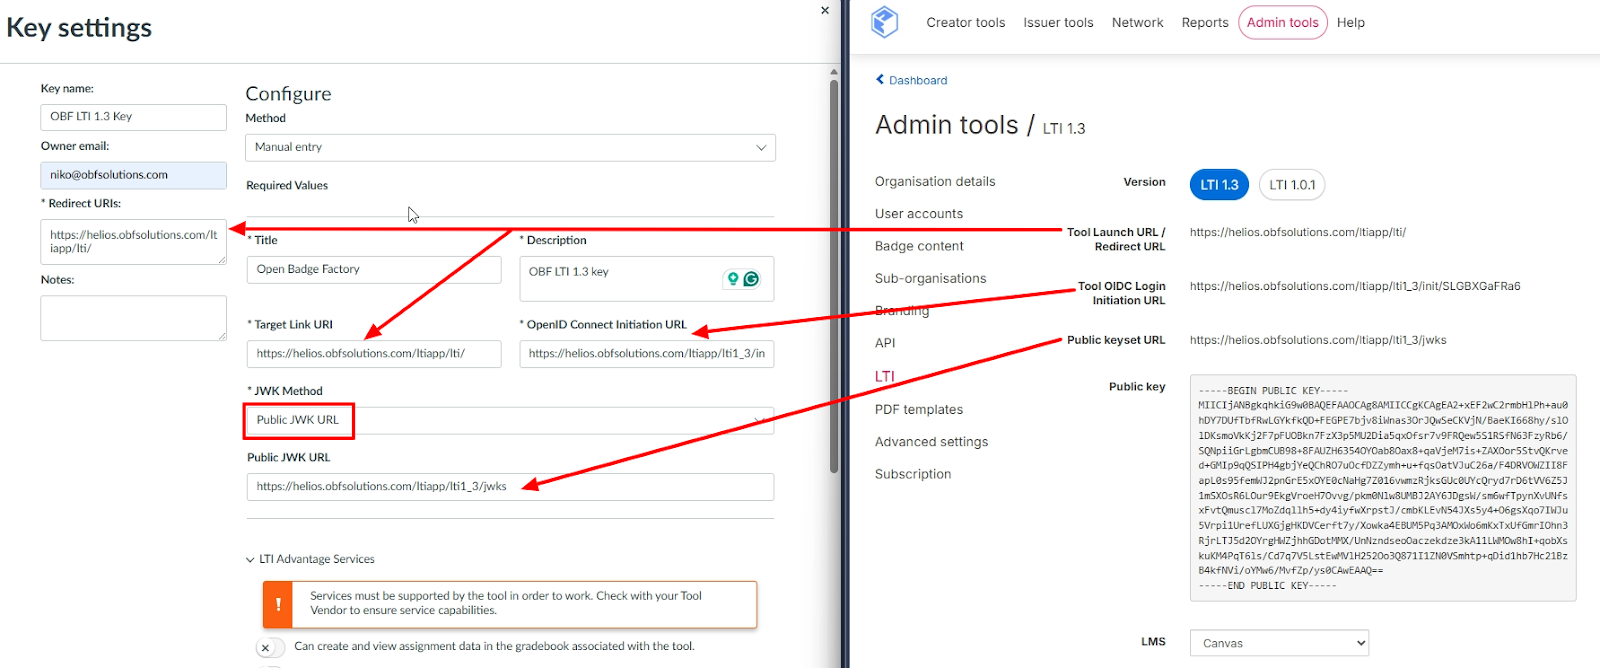
Canvas LMS on the left in the screencapture, OBF on the right
Continue in Canvas
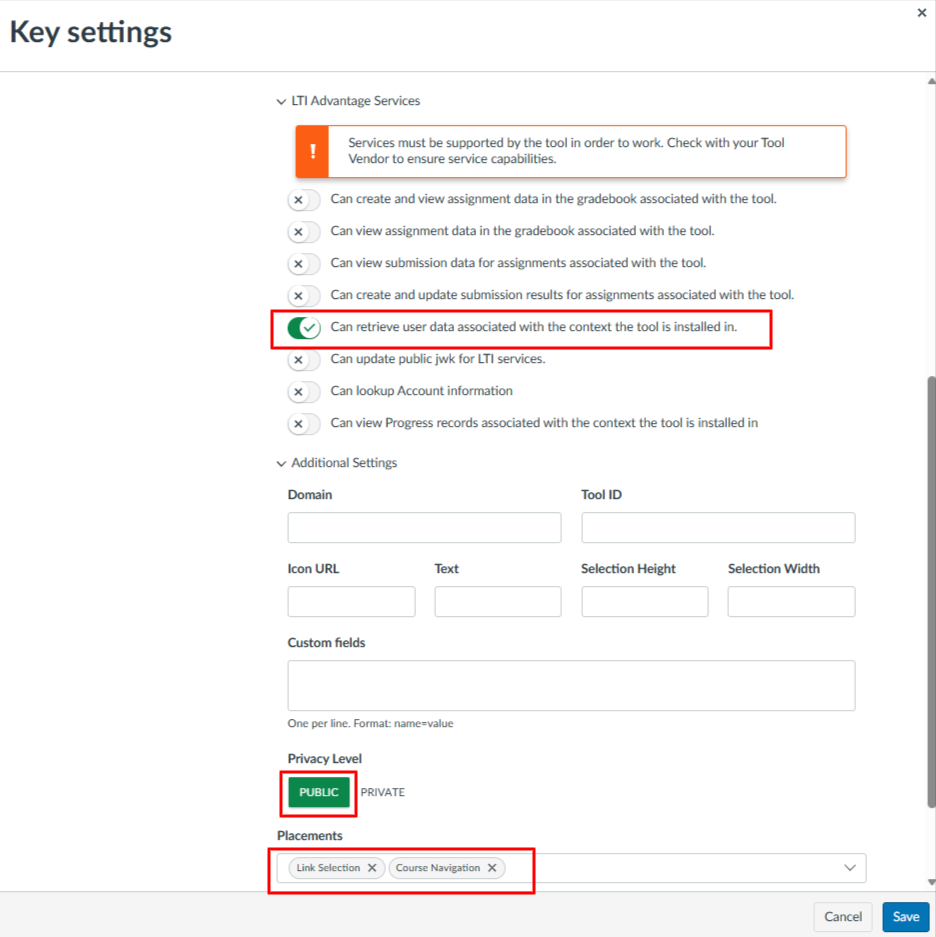
- Under "LTI Advantage Services", enable "Can retrieve user data associated with the
context the tool is installed in."
- Under "Additional Settings", set Privacy Level: Public.
Under "Placements", enable "Link Selection" and/or "Course Navigation".
- Course Navigation placement will create OBF menu item for the Course Navigation and show it in all courses.
- Link Selection allows users, such as teachers, to add OBF within course modules as an External Tool where wanted.
- Click "Save".
- Change key state: On.
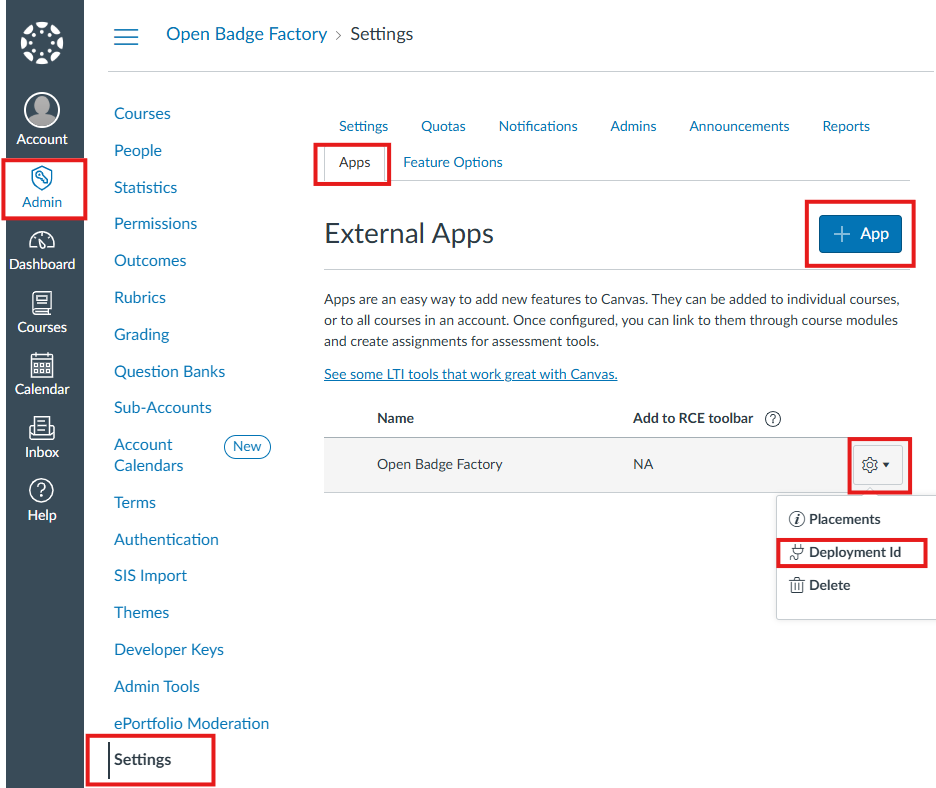
Step 2: Create Tool Deployment
How do I configure an external app for a course using a client ID? - Instructure Community
In Canvas
- Copy the Client ID created in the previous step, under "Details" column
- Go to Admin > your account > Settings > Apps > + App
- Choose Configuration Type: By Client ID
- Paste the Developer Key Client ID
- Click "Submit" and "Install"
- Find the OBF tool, click the gear icon and click "Deployment Id"
- Take note of the Deployment ID for later use in step 4
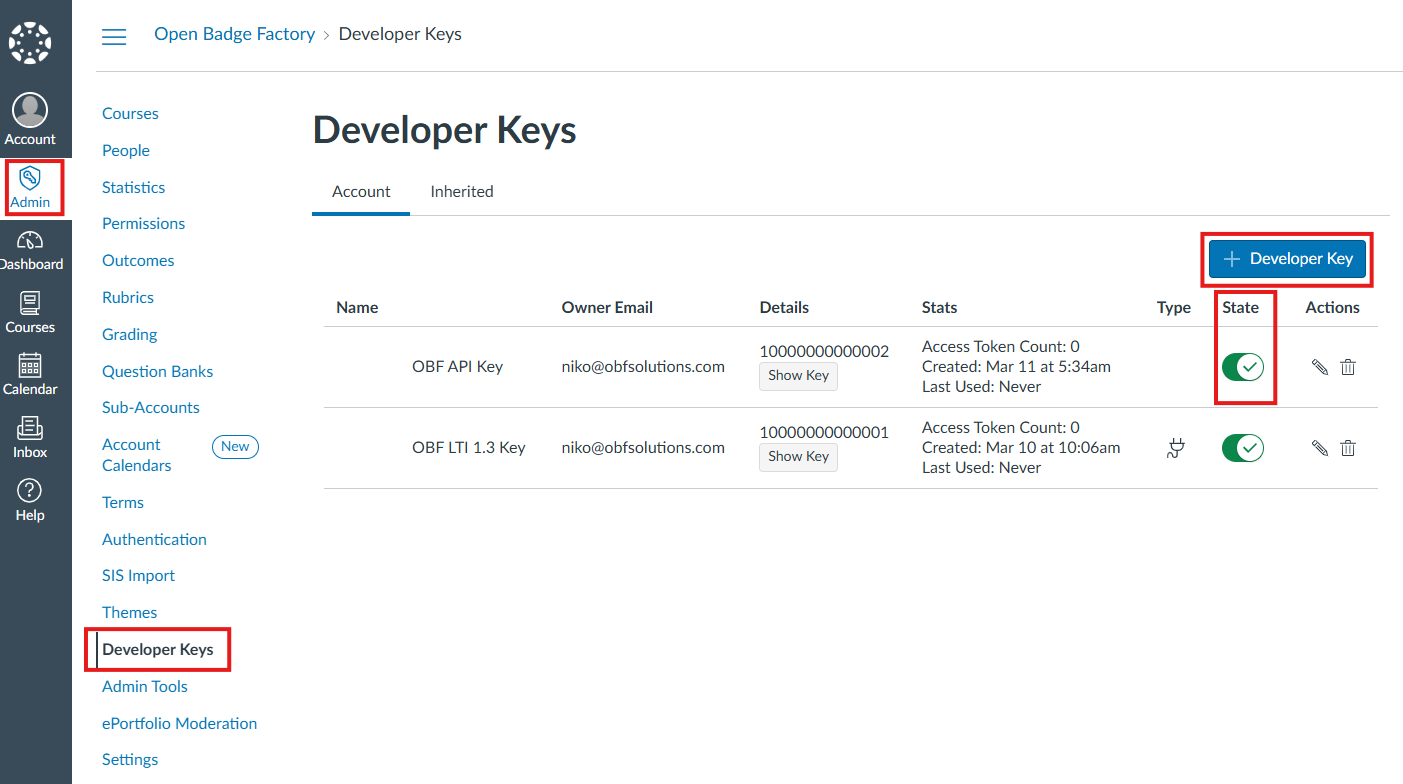
Step 3: Create API Developer Key
How do I add a developer API key for an account? - Instructure Community
In Canvas
- In Canvas, click Admin -> Developer Keys and click "+ Developer Key".
- Select "+ API Key" option.
- Input descriptive values to following fields:
- Key Name (e.g. "OBF API Key")
- Owner Email (e.g. your admin email)
Copy from OBF to Canvas
- From OBF, copy value: API key redirect URI => Redirect URIs
Continue in Canvas
- In Canvas API Key Settings:
- Switch on "Enforce Scopes"
- Enable "Allow include Parameters".
- Under "Courses", allow: url:GET|/api/v1/courses/:course_id/users
- Click "Save"
- Change key state: On
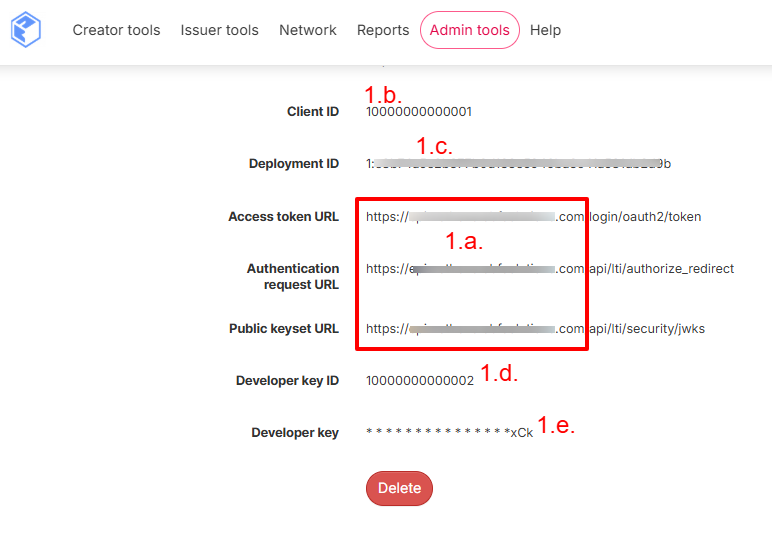
Step 4: Add Tool Deployment to Factory
Copy from Canvas to OBF
- In OBF, input the following values into the LTI settings form:
Canvas base URL => your Canvas installation url.
Client ID => LTI Developer Key id created in step 1.
Deployment ID => Deployment ID created in step 2.
Developer key ID => API Developer Key id created in step 3.
Developer key => API Developer Key created in step 3.
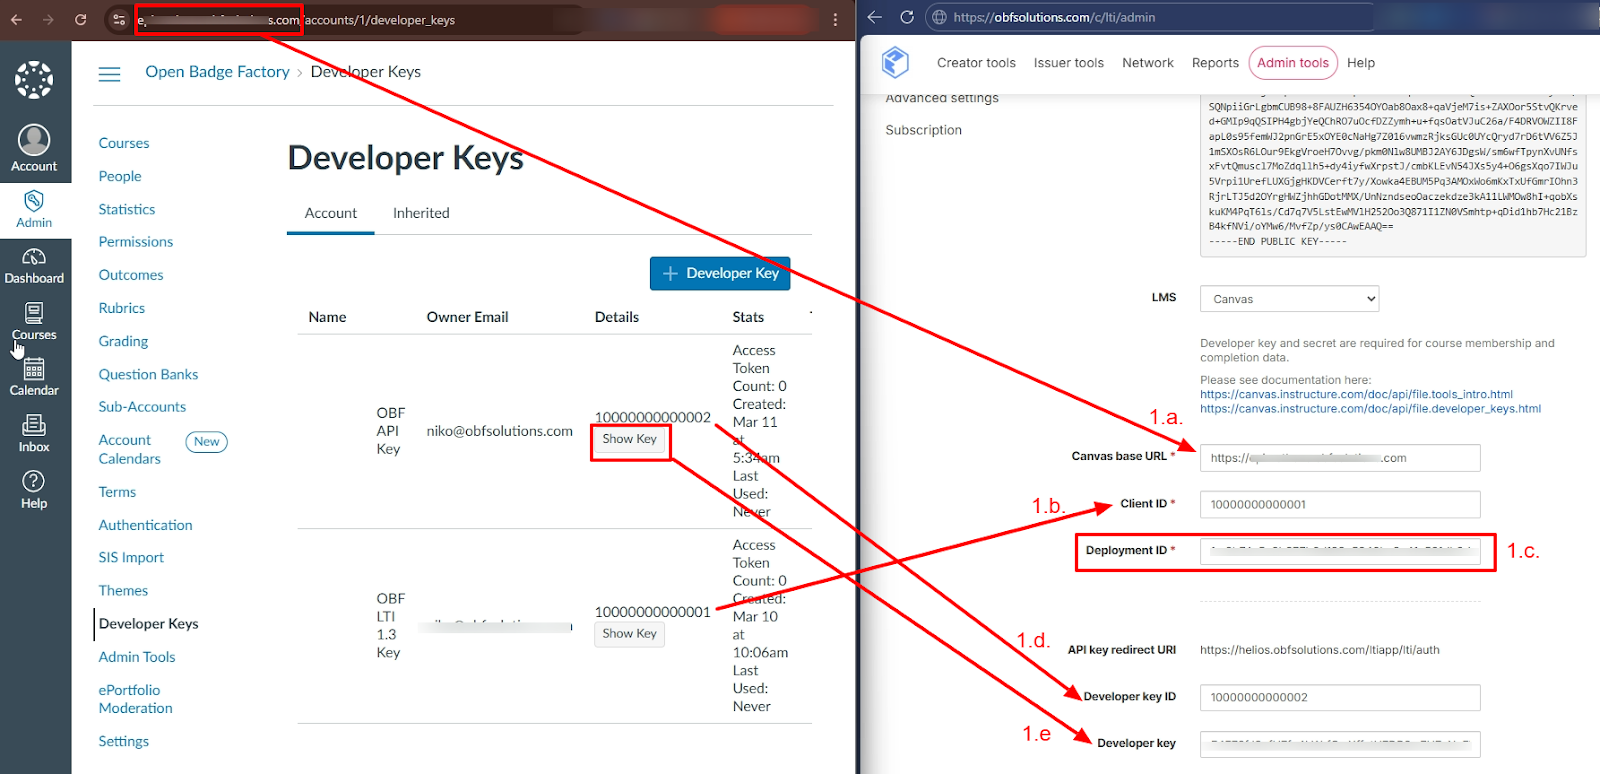
- Click "Add"
You’ll see the Step 4. values added in OBF > Admin Tools > LTI > at the end of the page.
Optional step 5: Add LTI Link to Courses
This step can be done by users (such as teachers) with the right to create Canvas module items if the tool has “Link Selection” placement enabled in step 1.
The Factory LTI tool will be automatically visible in the Course navigation panel if you
selected "Course Navigation" placement in step 1. This step is optional in that case.
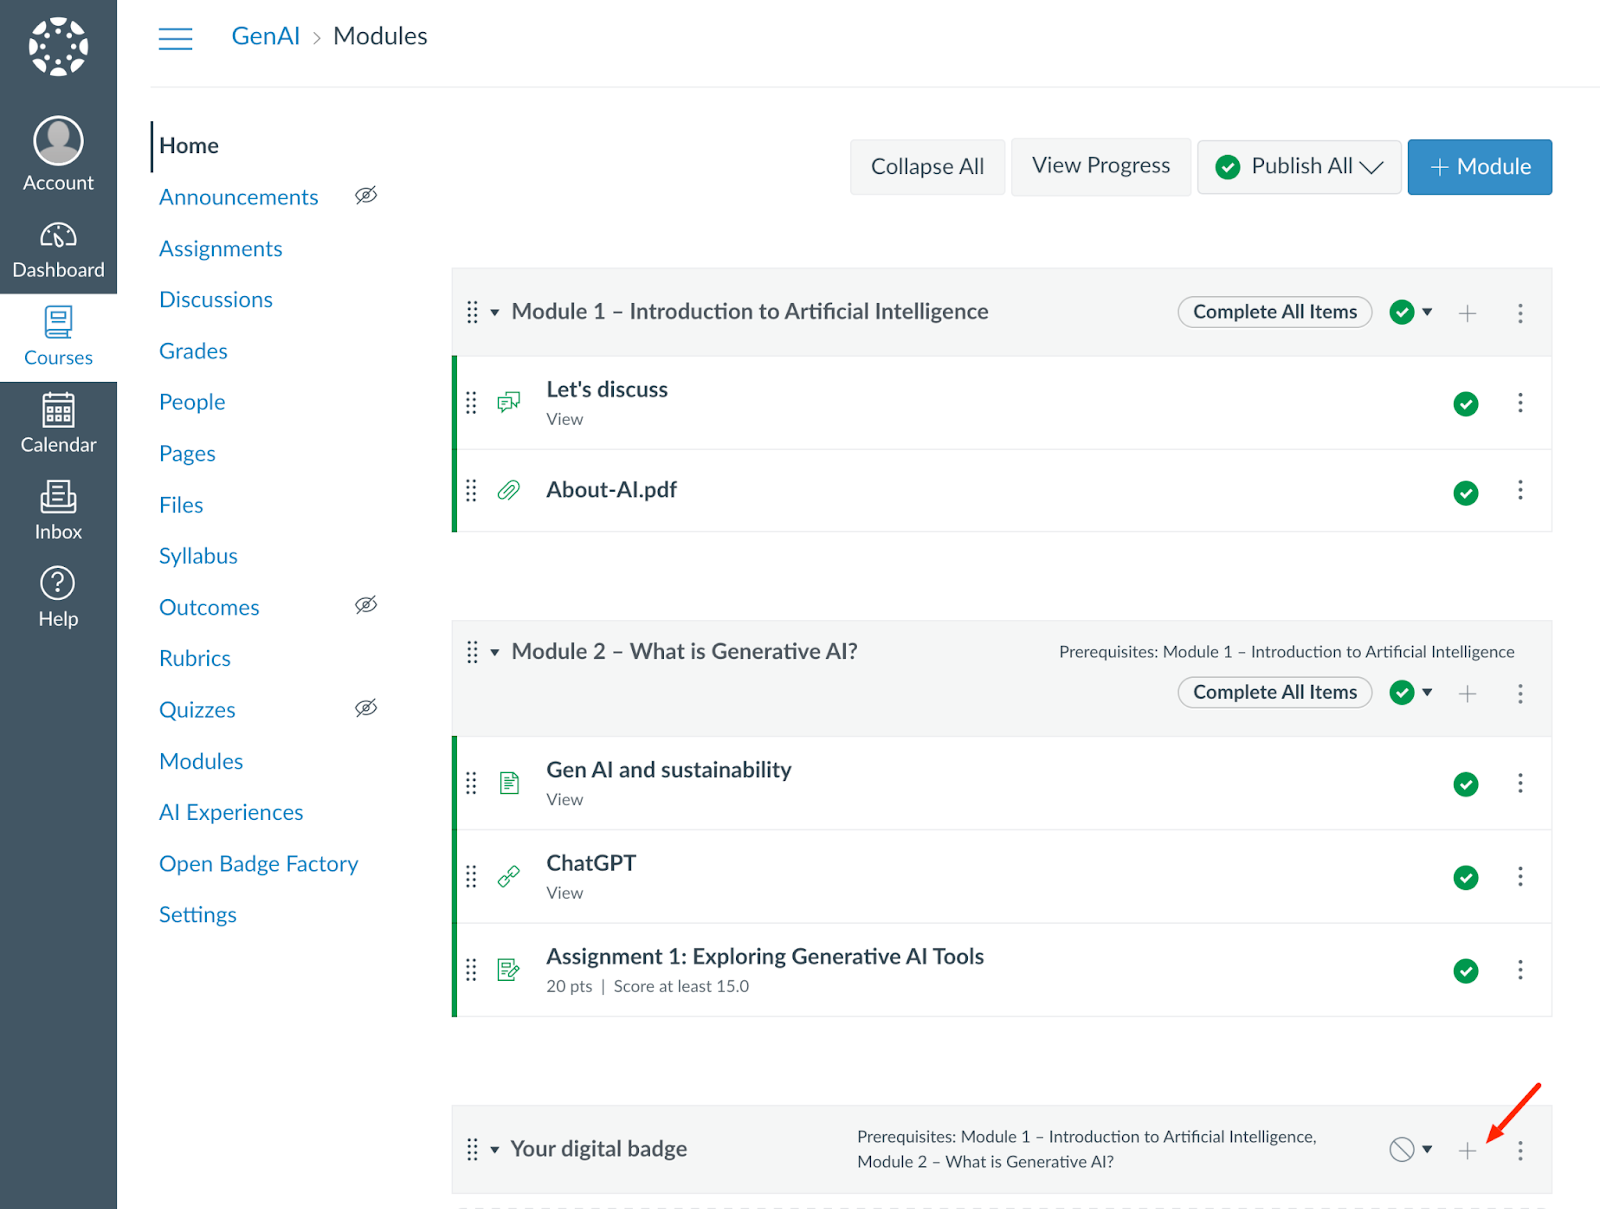
- Go to a Course, click the "Modules" link in the Course Navigation.
- In the Module, click the + button.
- In the item type drop-down menu, select External Tool.
- Find the OBF external tool and review the settings.
- Click "Add Item".
In the “Usage” chapter, this same configuration is described from the teacher’s perspective.
You don’t have to do this twice, or at all, if using just Course Navigation placement.
Usage
Requirements for OBF’s LTI Canvas integration usage
For all users, browser third-party cookies must be enabled: How do I enable third-party cookies in my browser? - Instructure Community
All users issuing badges and wishing to access course members and completion data should authorise the OBF LTI integration
OBF External Tool shown either in the global Course Navigation or course specific module through Link Selection
External Tool placement
Decide either “Course Navigation” or “Link Selection” placement in Canvas to show the OBF External Tool.
Course Navigation does not require additional configuration and sets OBF link globally to all Canvas courses if selected in “Connecting Open Badge Factory to Canvas - Step 1”
Link Selection needs user like Admin or Teacher to add LTI link to targeted course module. This way you can decide what course modules show OBF External Tool. Follow either
instructions in “Connecting Open Badge Factory to Canvas” and “Optional step 5”
or instructions in “Usage” and “Optional: Add LTI Link to Courses from the teacher’s perspective”
Optional: Add LTI Link to Courses from the teacher’s perspective
Performing this step requires user rights to create course module items, and the OBF LTI integration must have Link Selection placement enabled.
- Go to your course
- In the targeted module, click the + button
- In the dropdown menu, select External Tool:
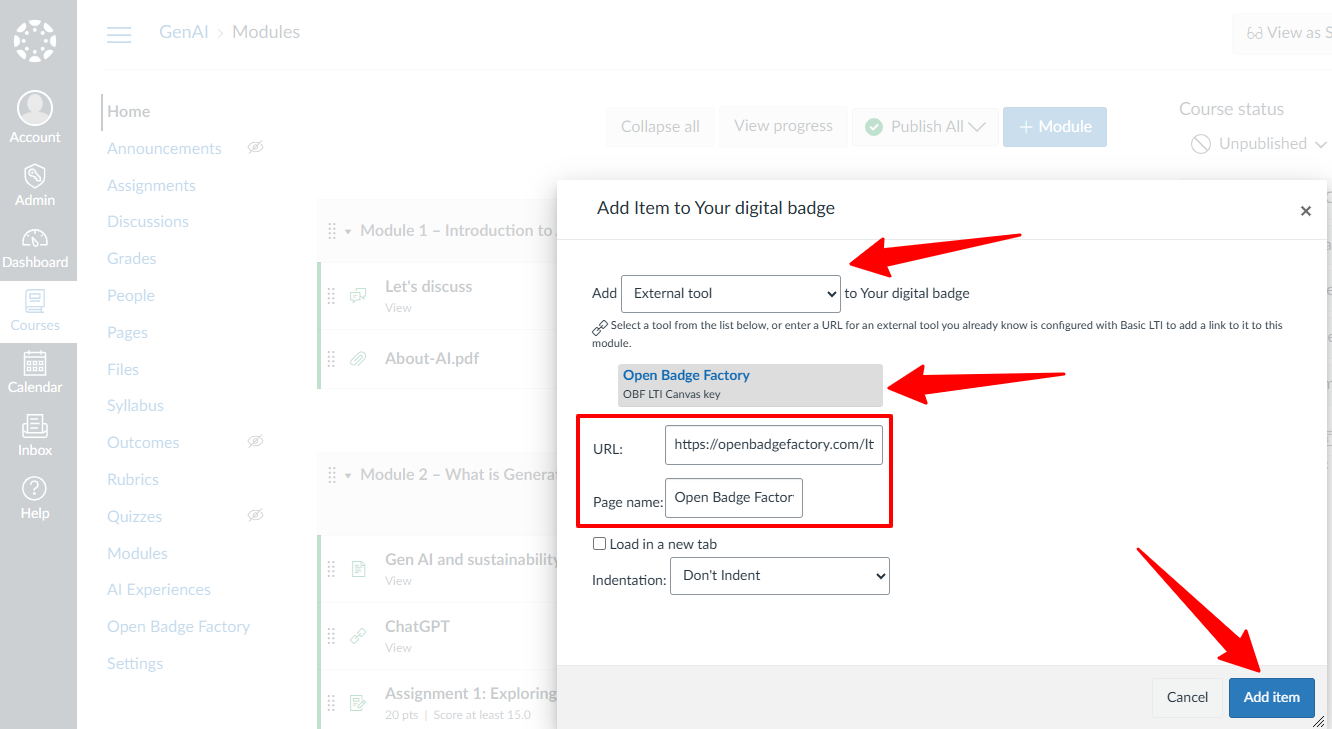
- Find the Open Badge Factory external tool and click it, default settings will be filled in automatically
- Click Add item
Your external tool is now added to your course:
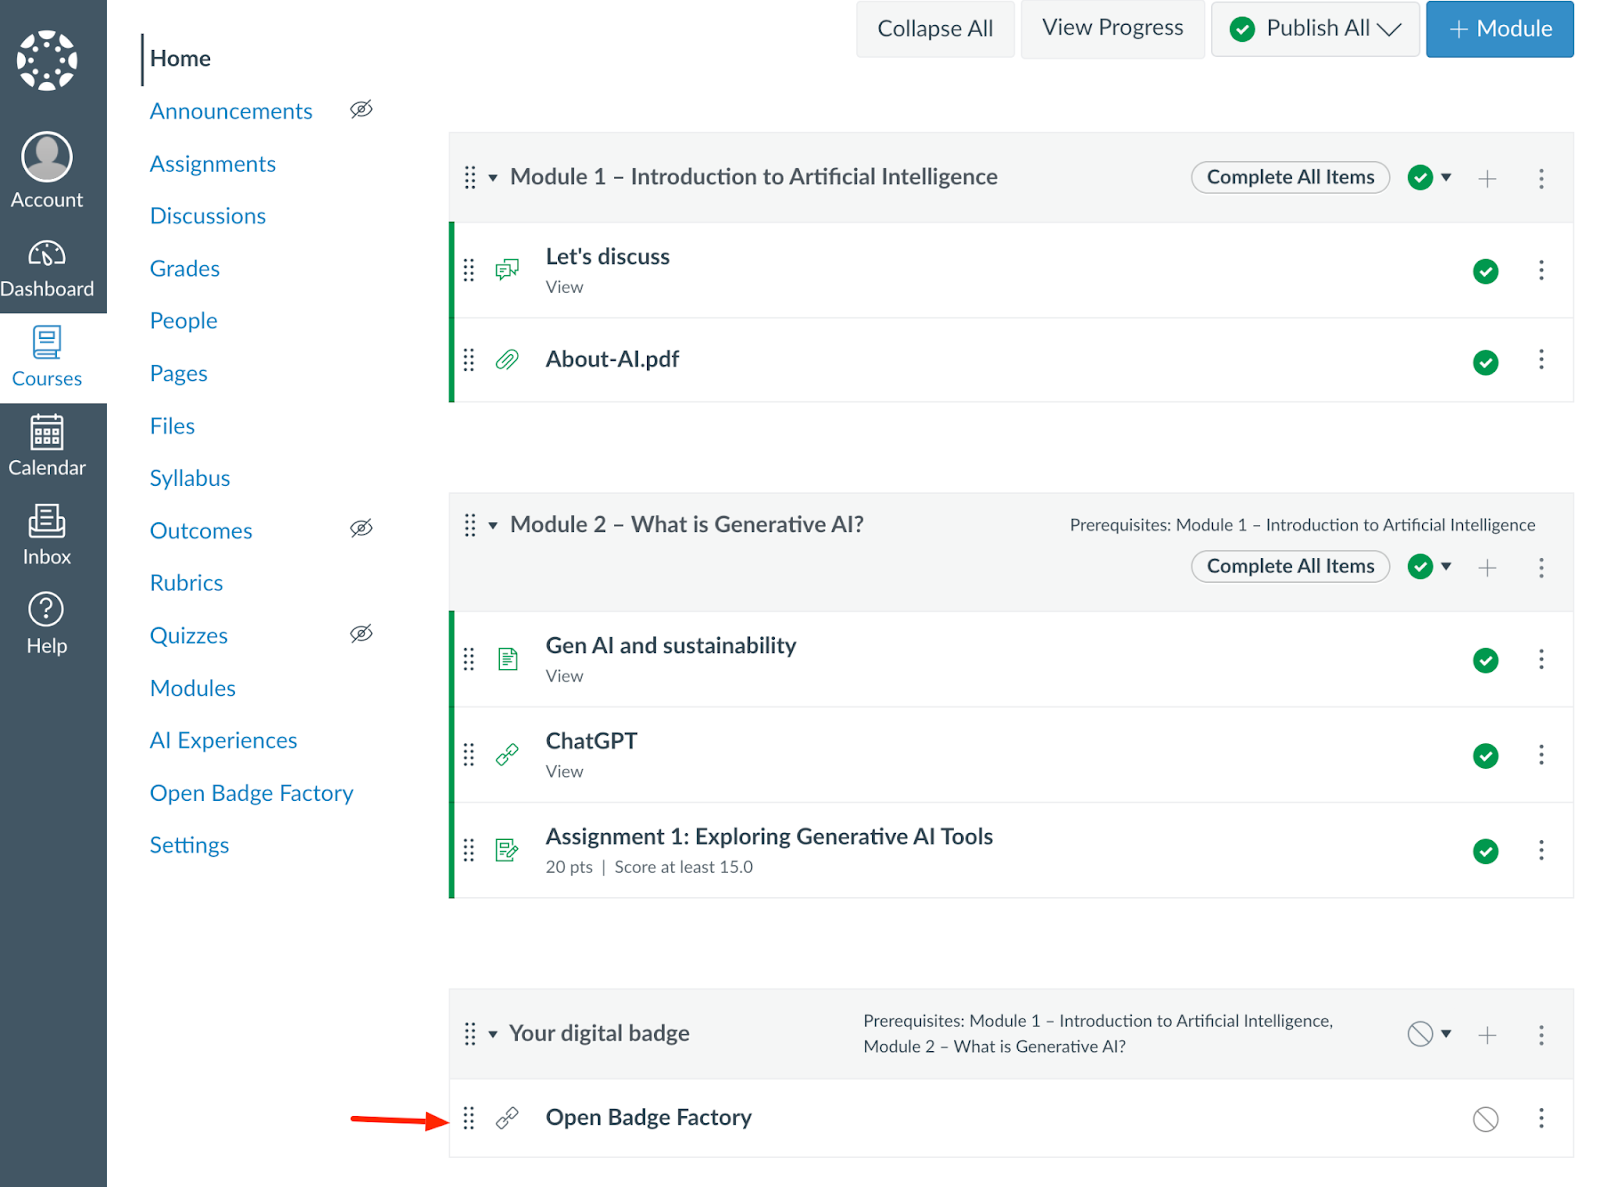
- Click this external item
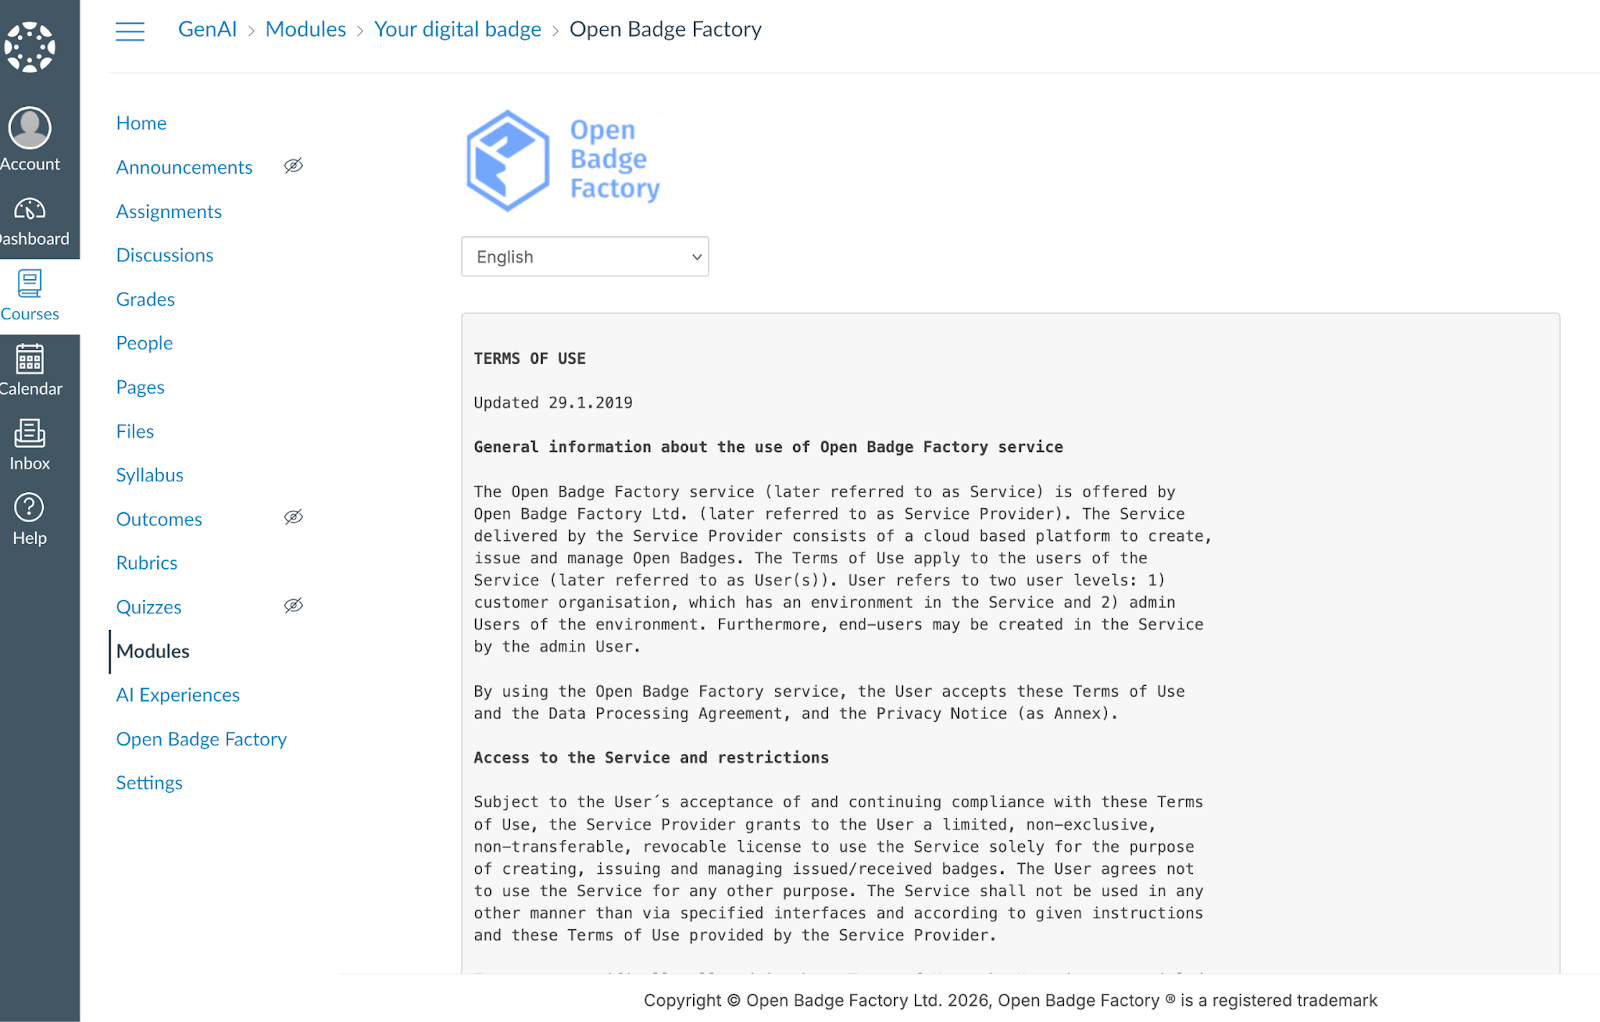
- You may have to accept the “Terms of use” the first time you add this external tool. Read and tick the box “I have read the terms above, and I accept,” then click the “Continue” button.
Authorize
The final step will be to authorize this LTI integration to access course members and completion data.
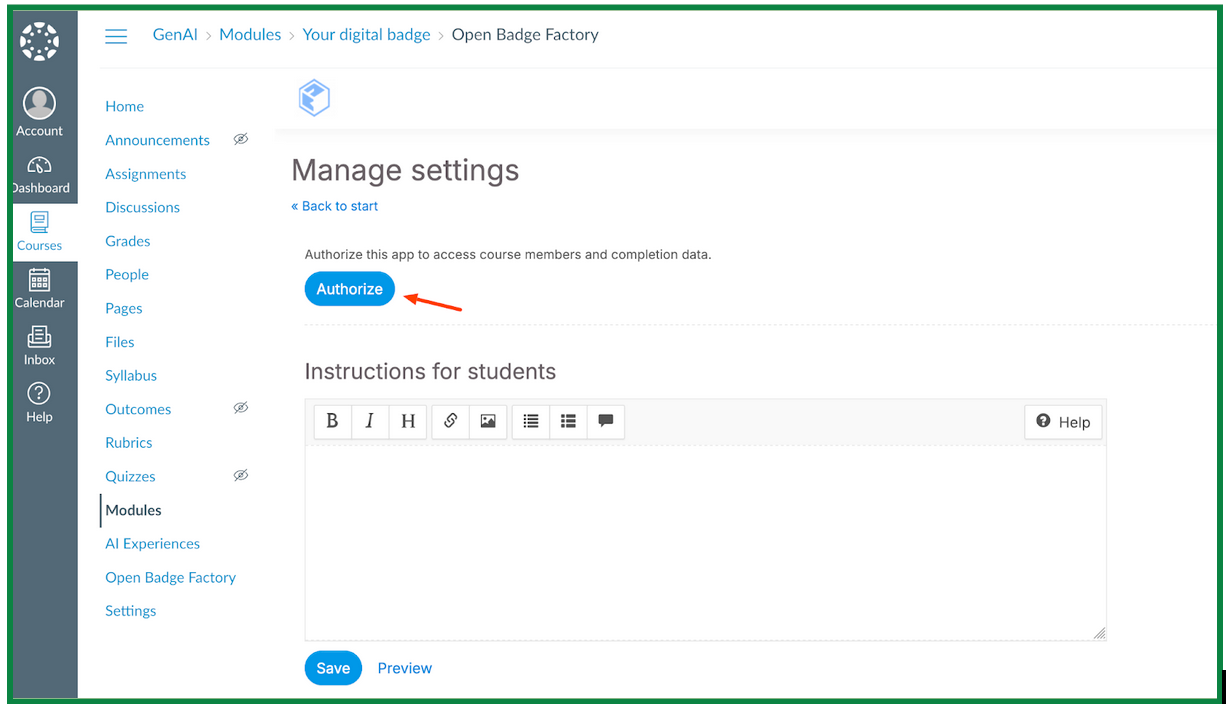
Important warning! This authorization is user-specific and applies to all courses.
- Each teacher/admin should authorize once.
- Removing authorization will revoke the user's authorization for all courses.
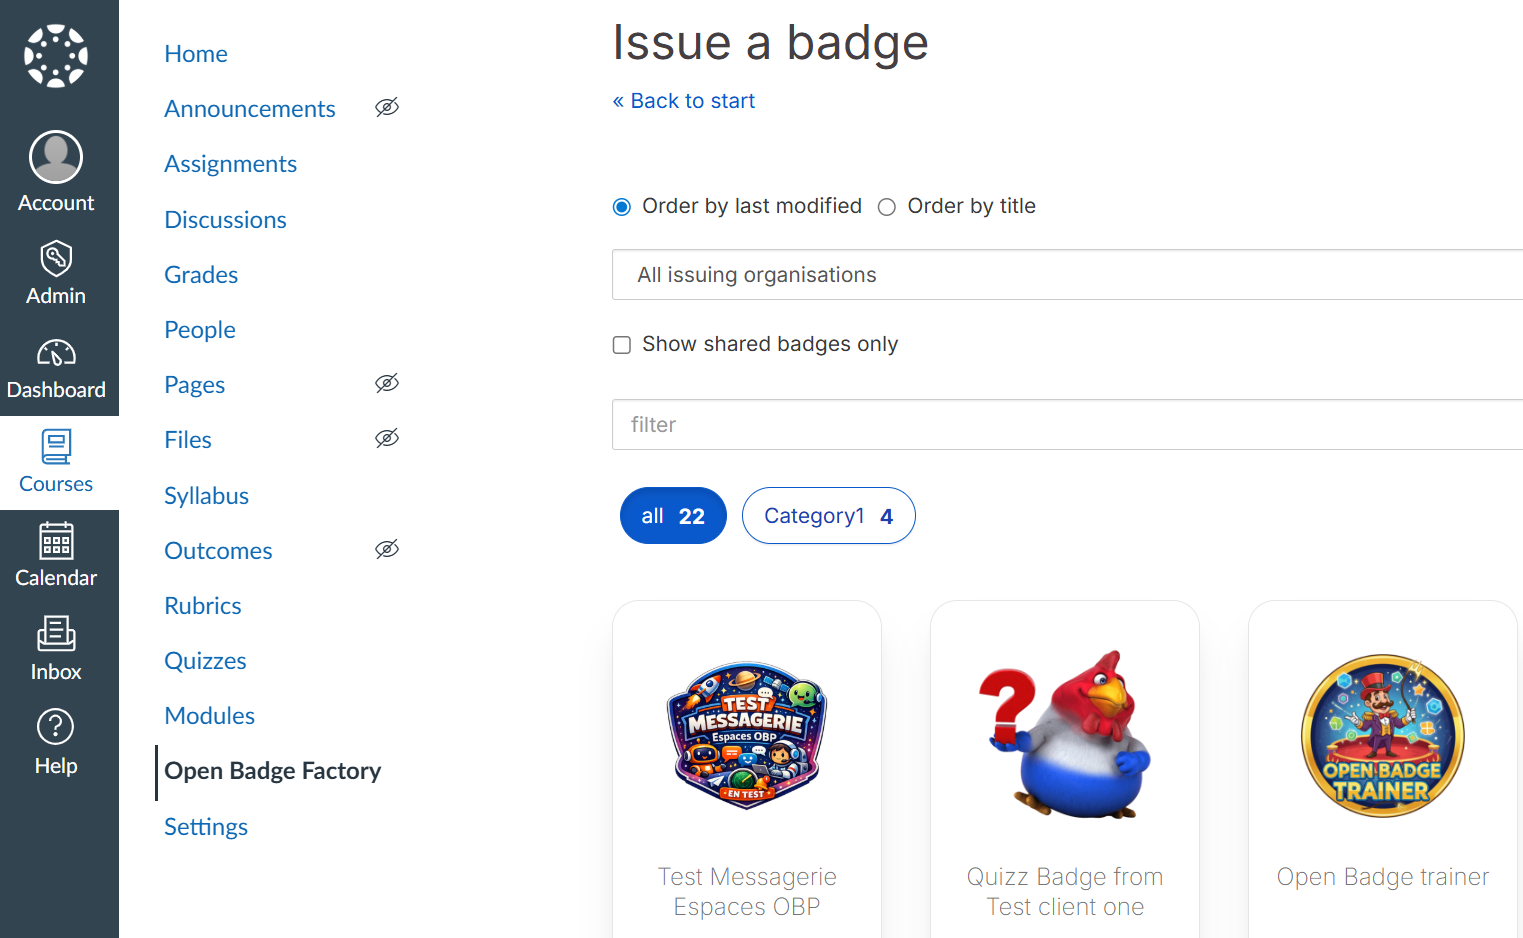
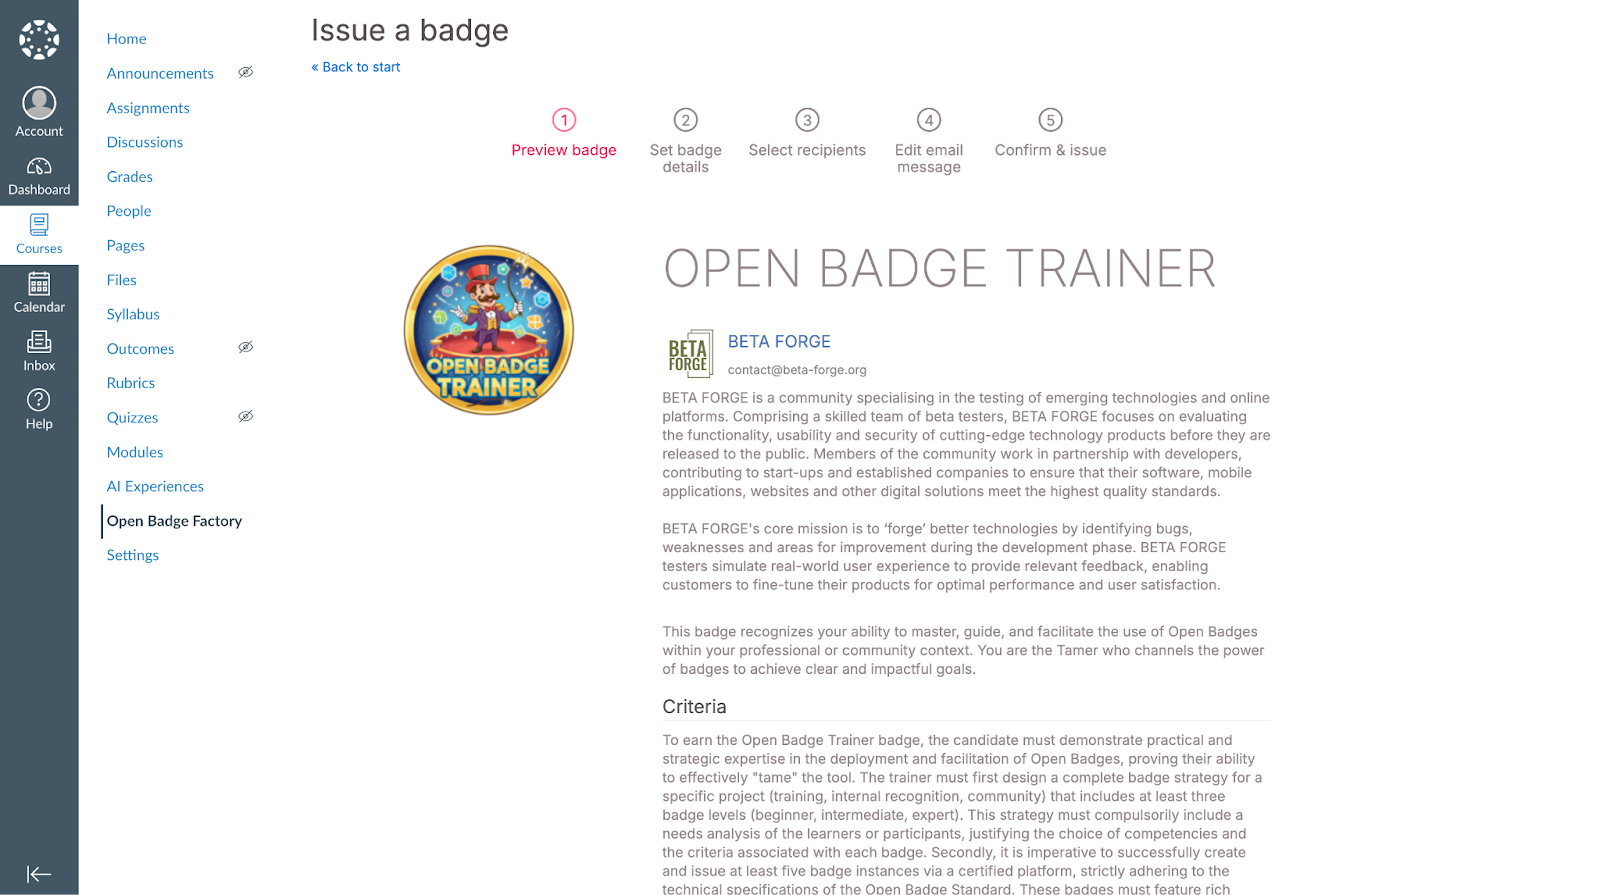
Issuing a badge to course participants manually
From your course, click “Issue a badge”.
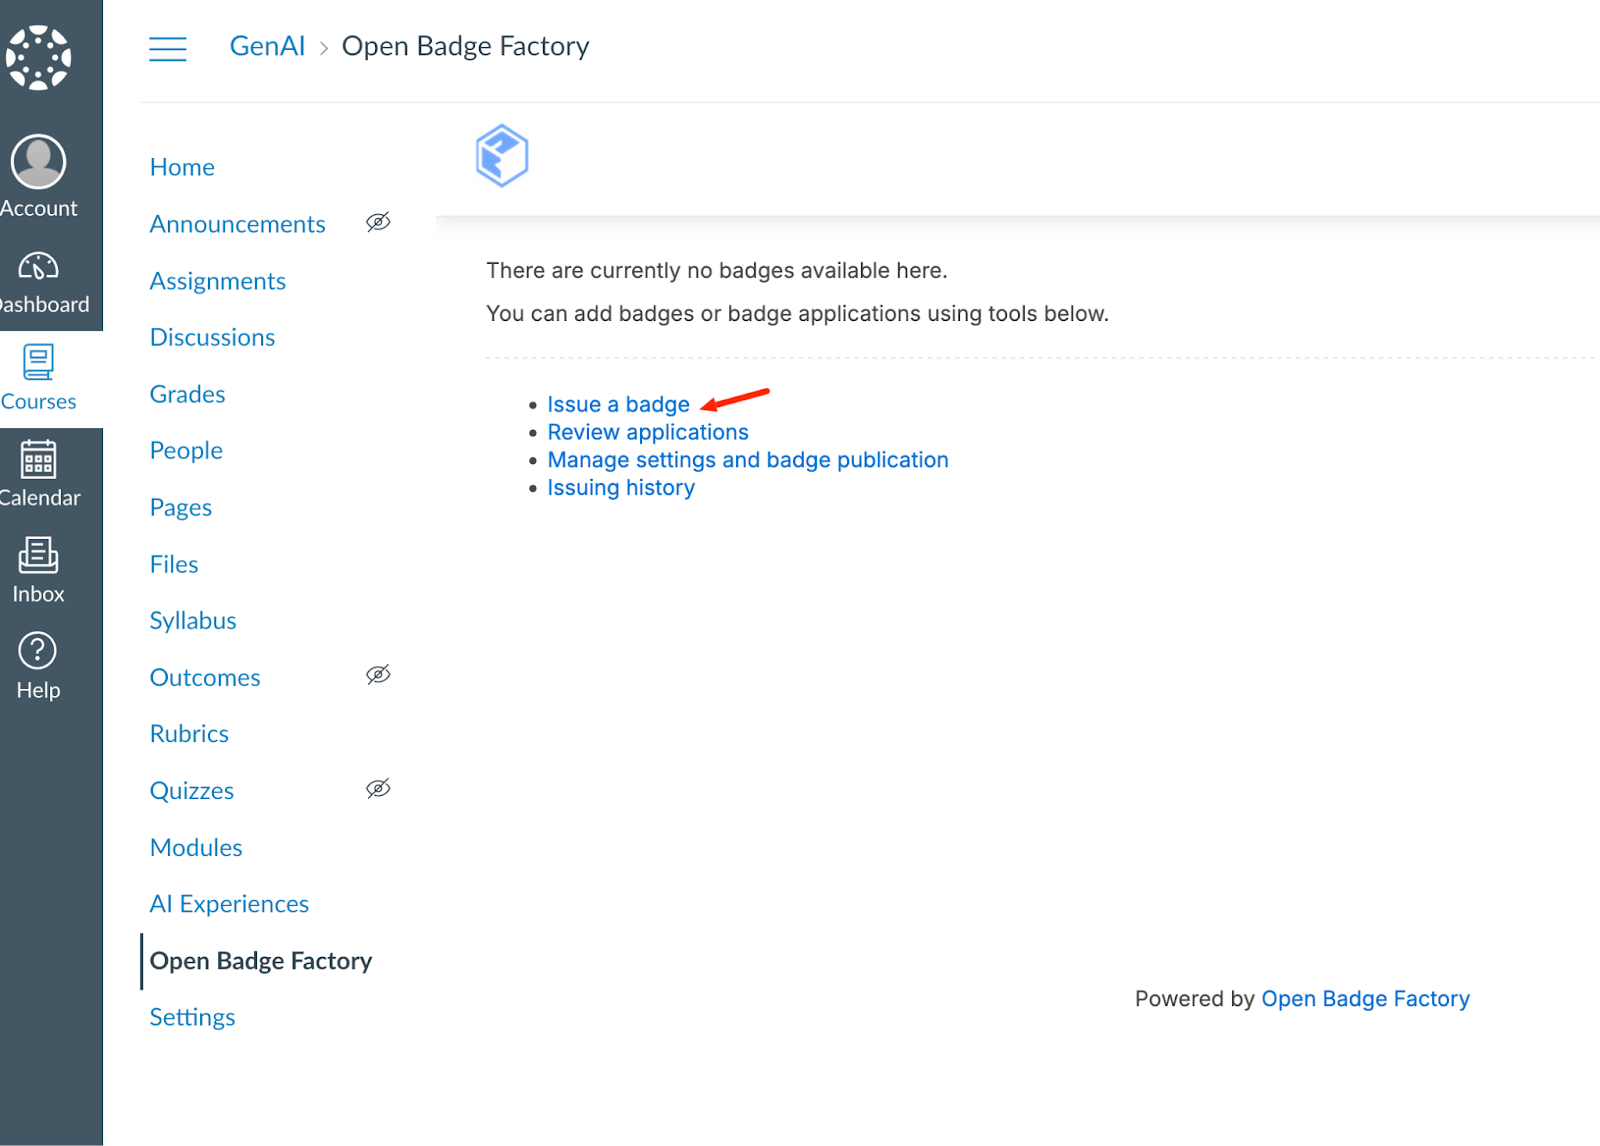
And select the badge you want to issue.
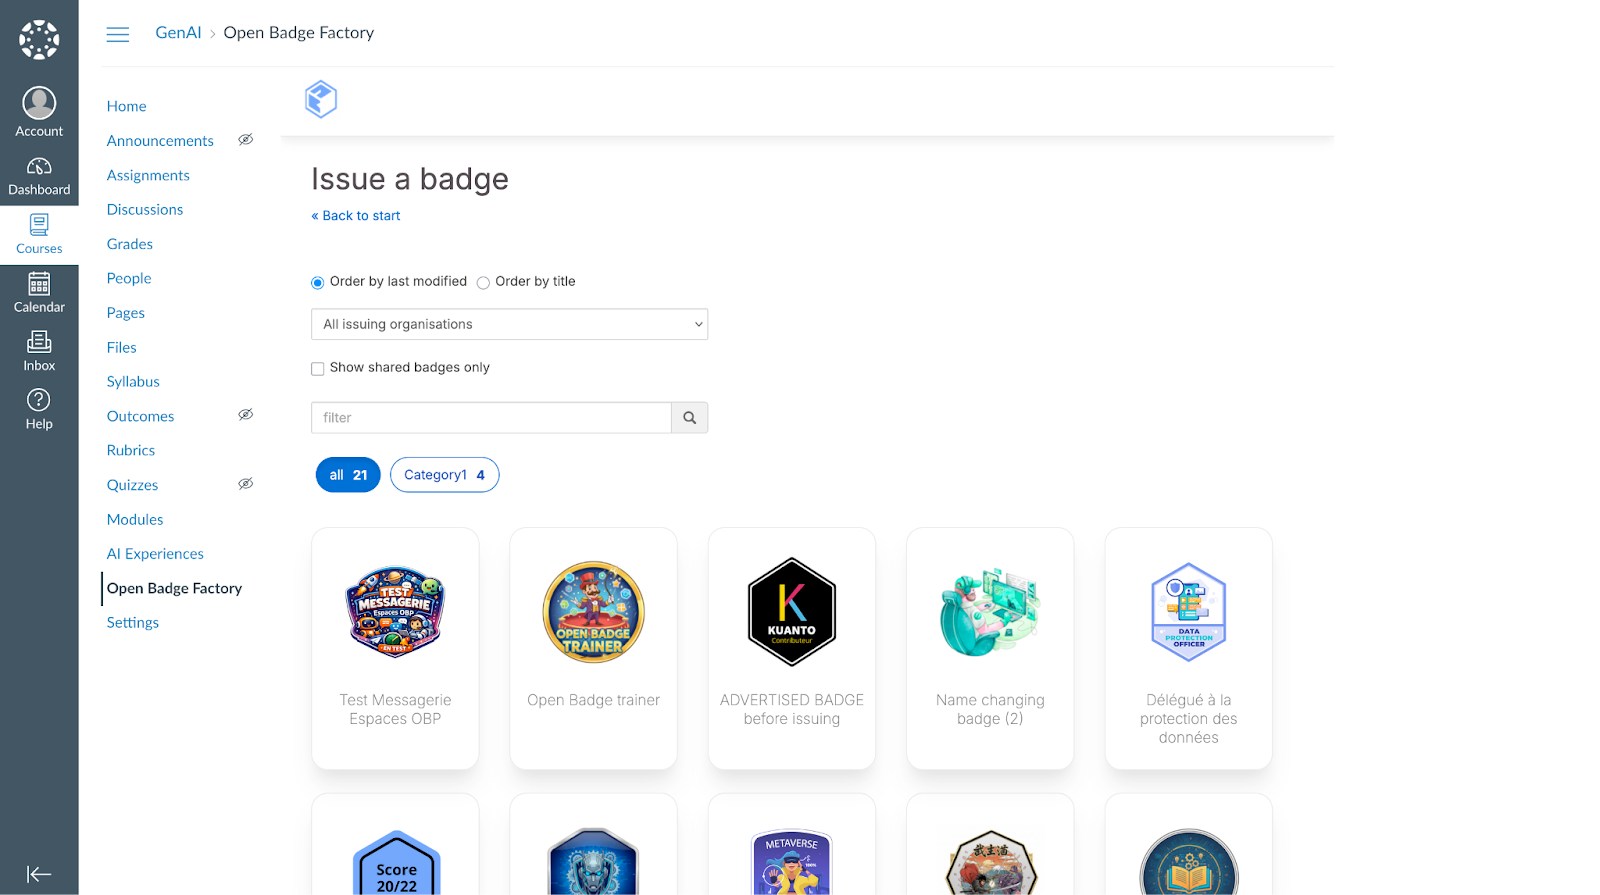
Now you see the generic issuing navigation process from OBF:
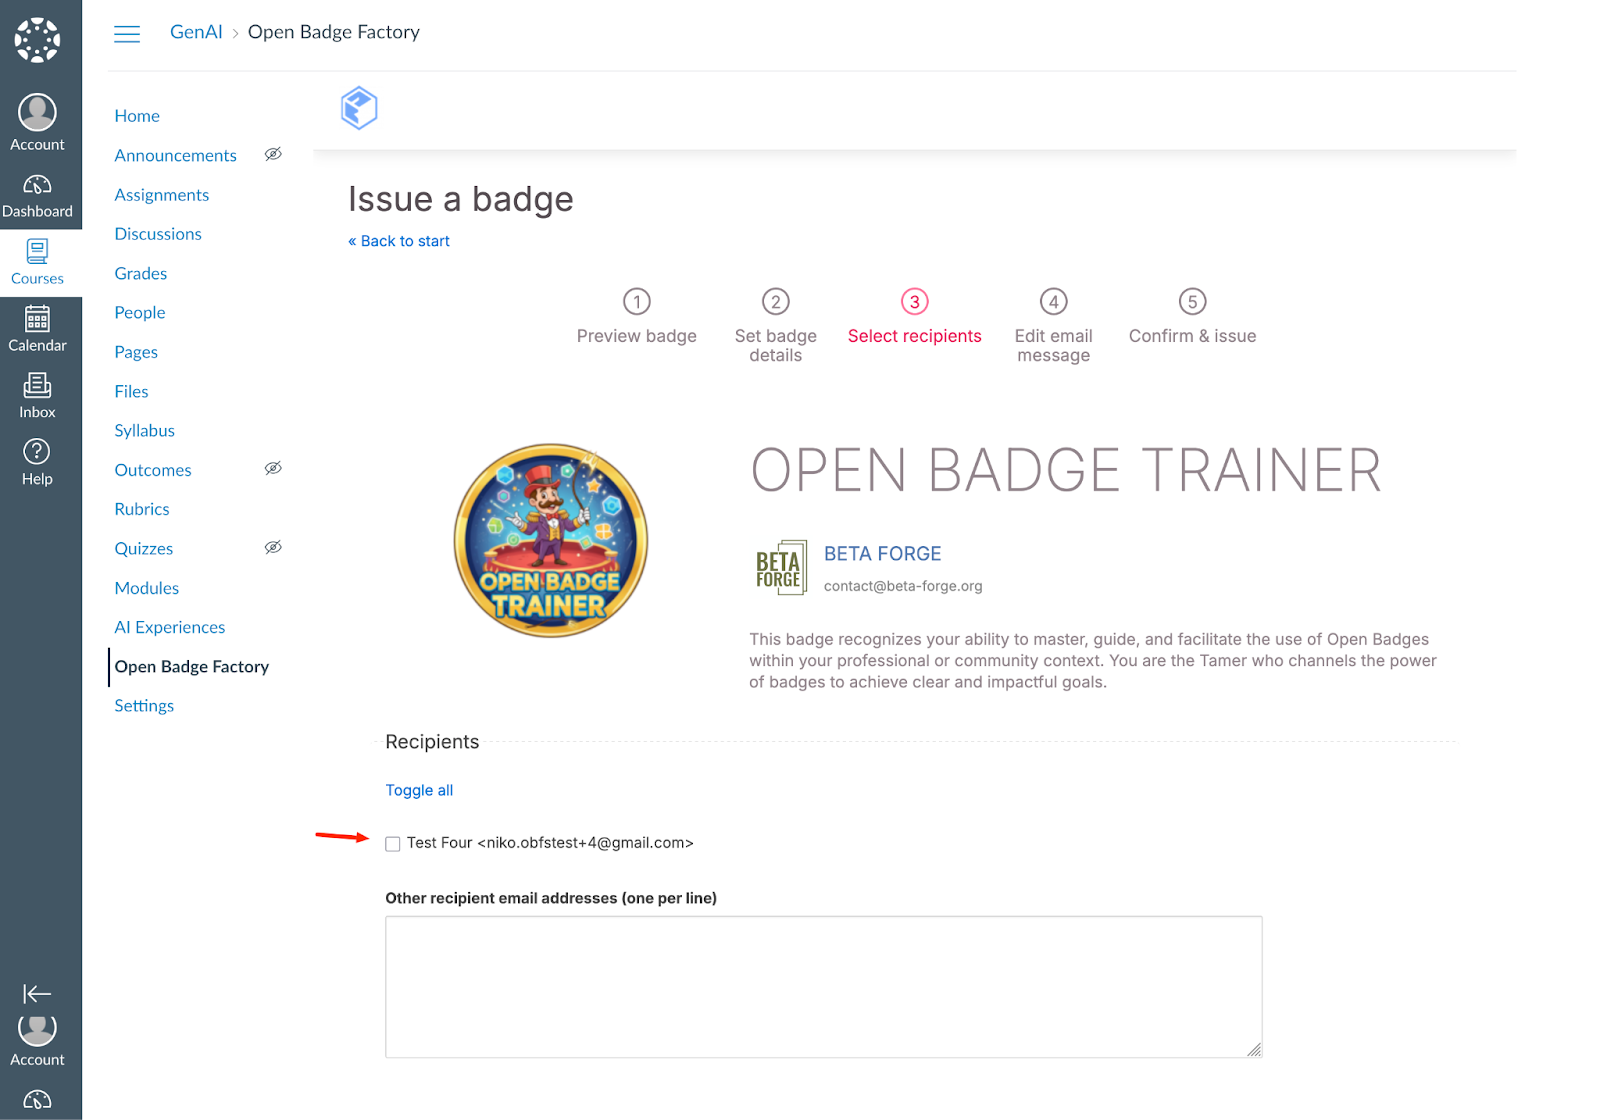
Go through step 3 to select your badge recipients:
- You can see all your students here. Tick the students for which you want to issue the badge or select all by clicking the “Toggle all” link.
- You can also add additional recipient emails here.
Then jump top step 5 to confirm the badge issuing
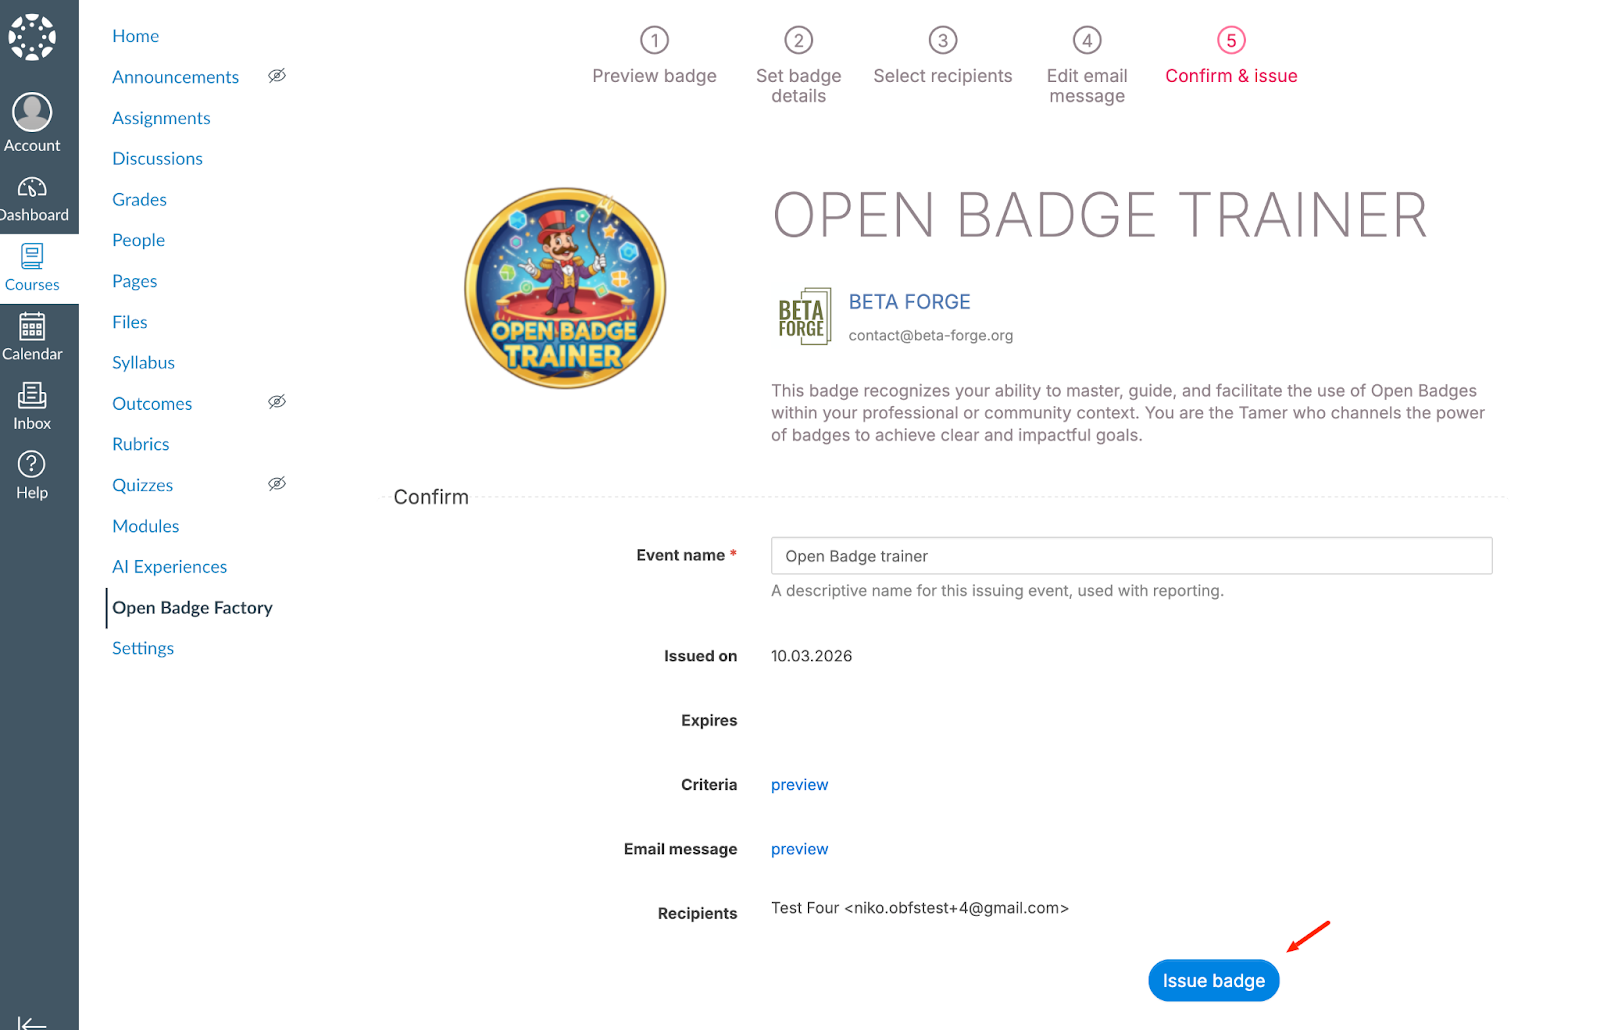
The student will receive straight the badge issuing email.
Issuing a badge automatically on course conclusion or score
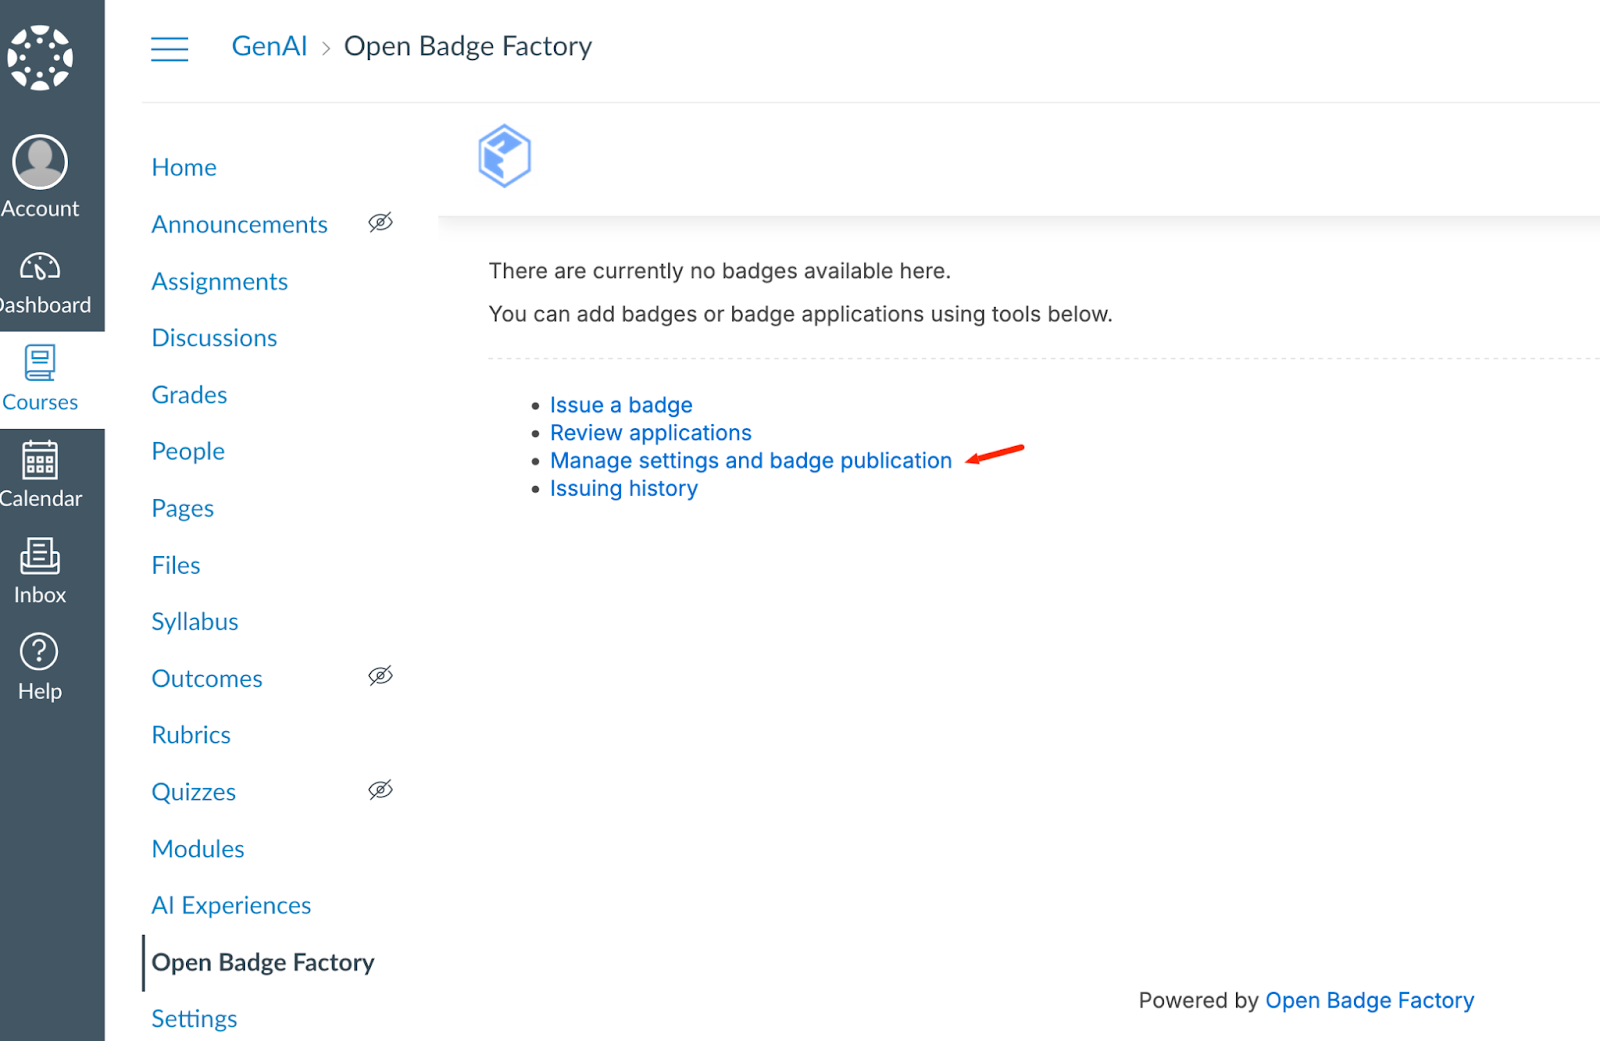
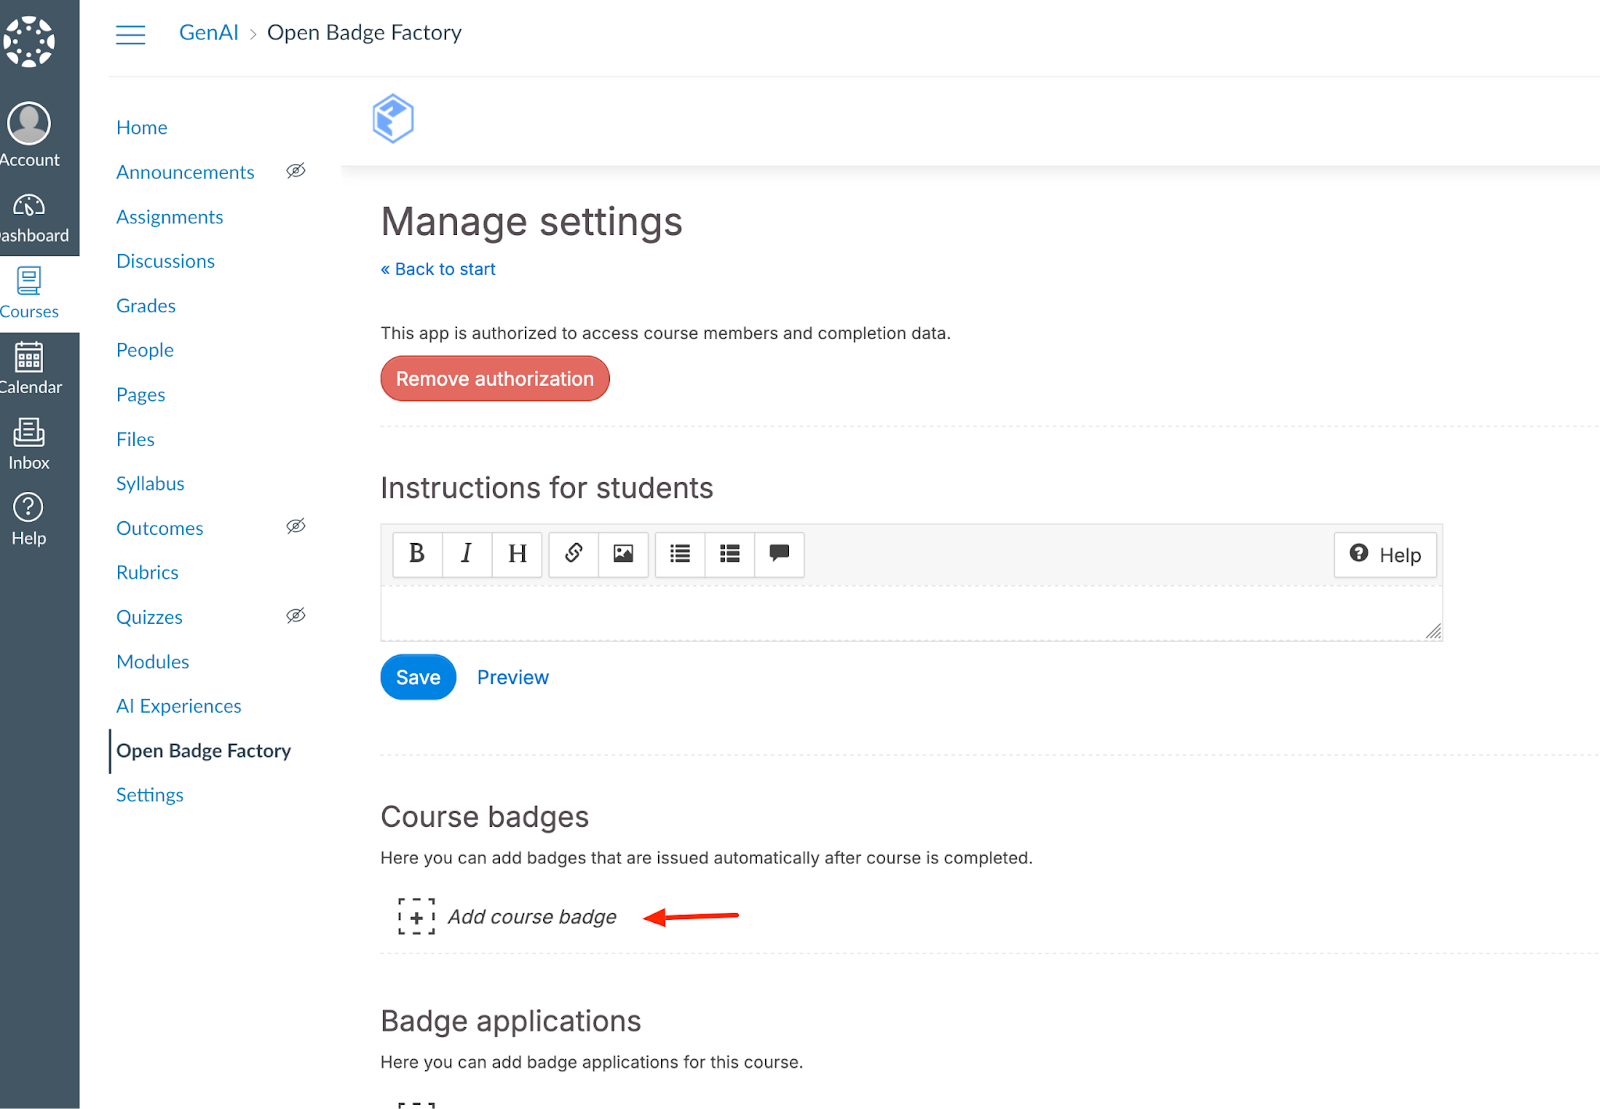
You can also create rules to issue badges automatically based on the course’s conclusion or score. Let’s go to the item menu “Manage settings and badge publication”:
Click Course badges > Add course badge
Automatic badge issuing default behaviour
Select your badge. By default, your badge is configured to be issued automatically upon the course’s conclusion, or more precisely, upon the user’s course conclusion.
Canvas LMS concludes all student enrollments after the course end time.
Teachers/admins can manually conclude either the course or the user enrollment.
All course participants are issued the badge by default.
Successfully passing or not passing the course requirements does not affect the user’s course conclusion.
Once you select your badge, it will be sent automatically after the course has concluded.
Automatic badge issuing based on score & while the course is active
If you want to issue a badge based on the student's final score:
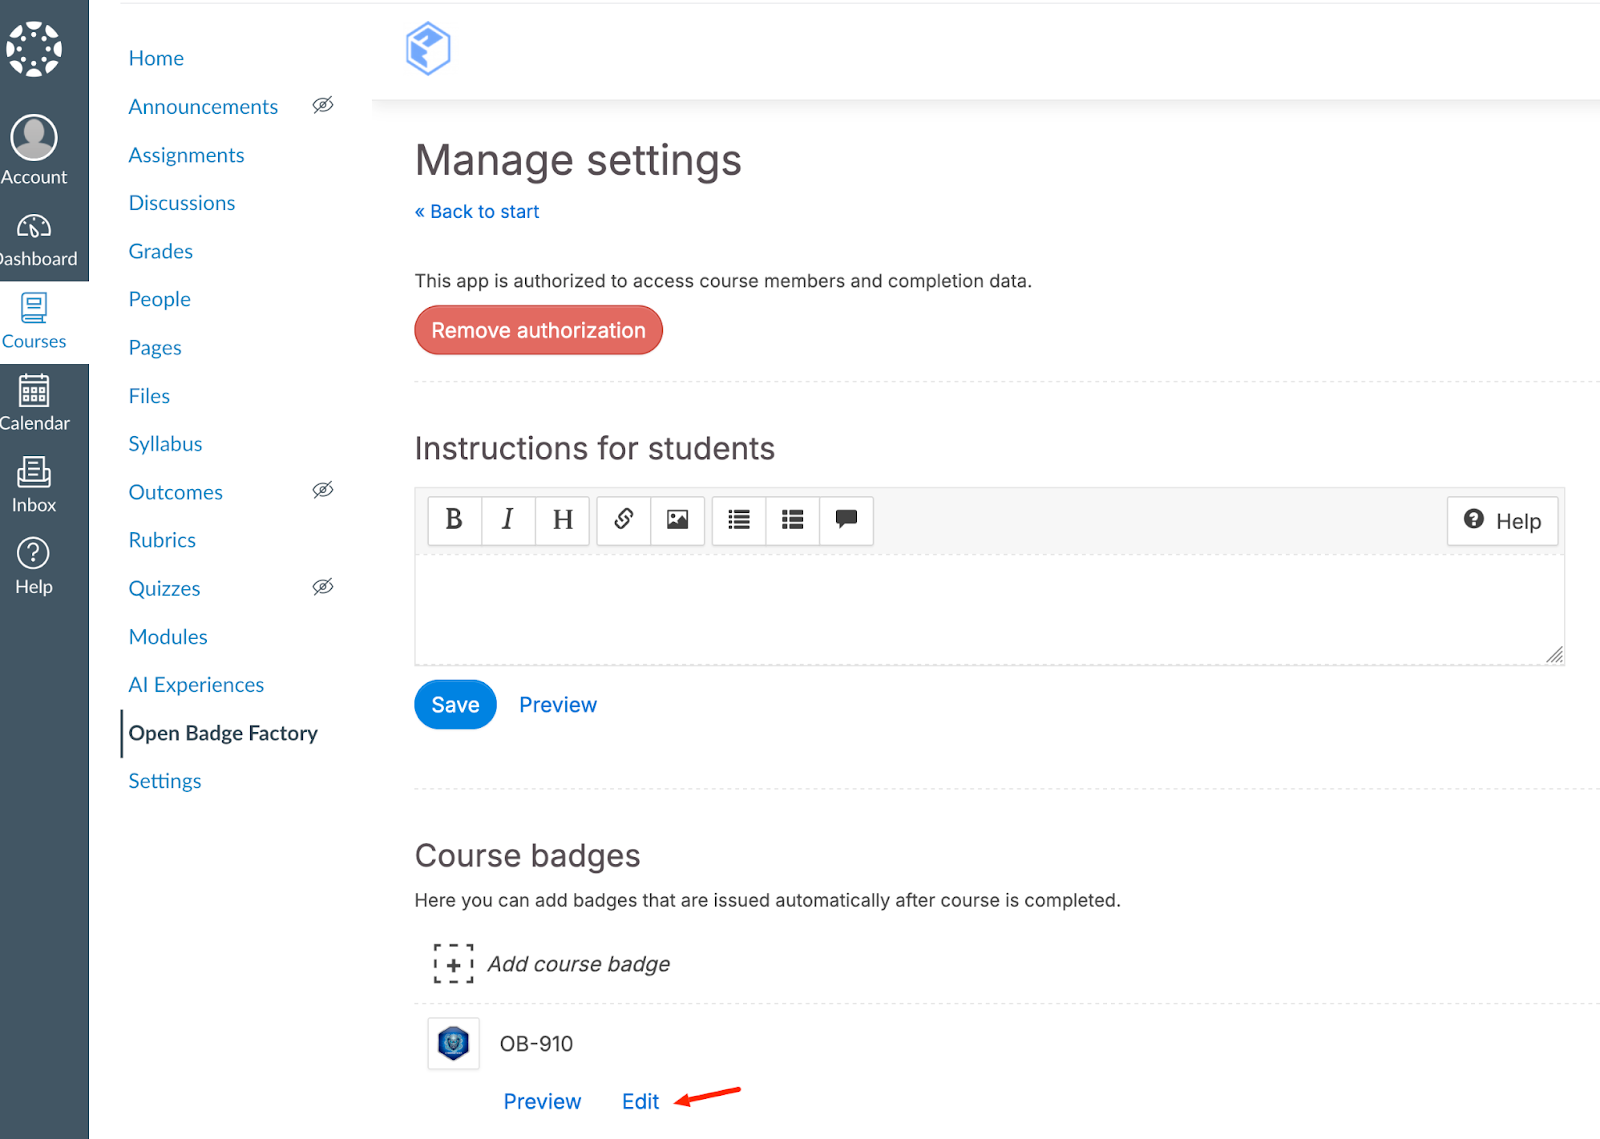
Click “Edit” for the badge for which you want to create rules.
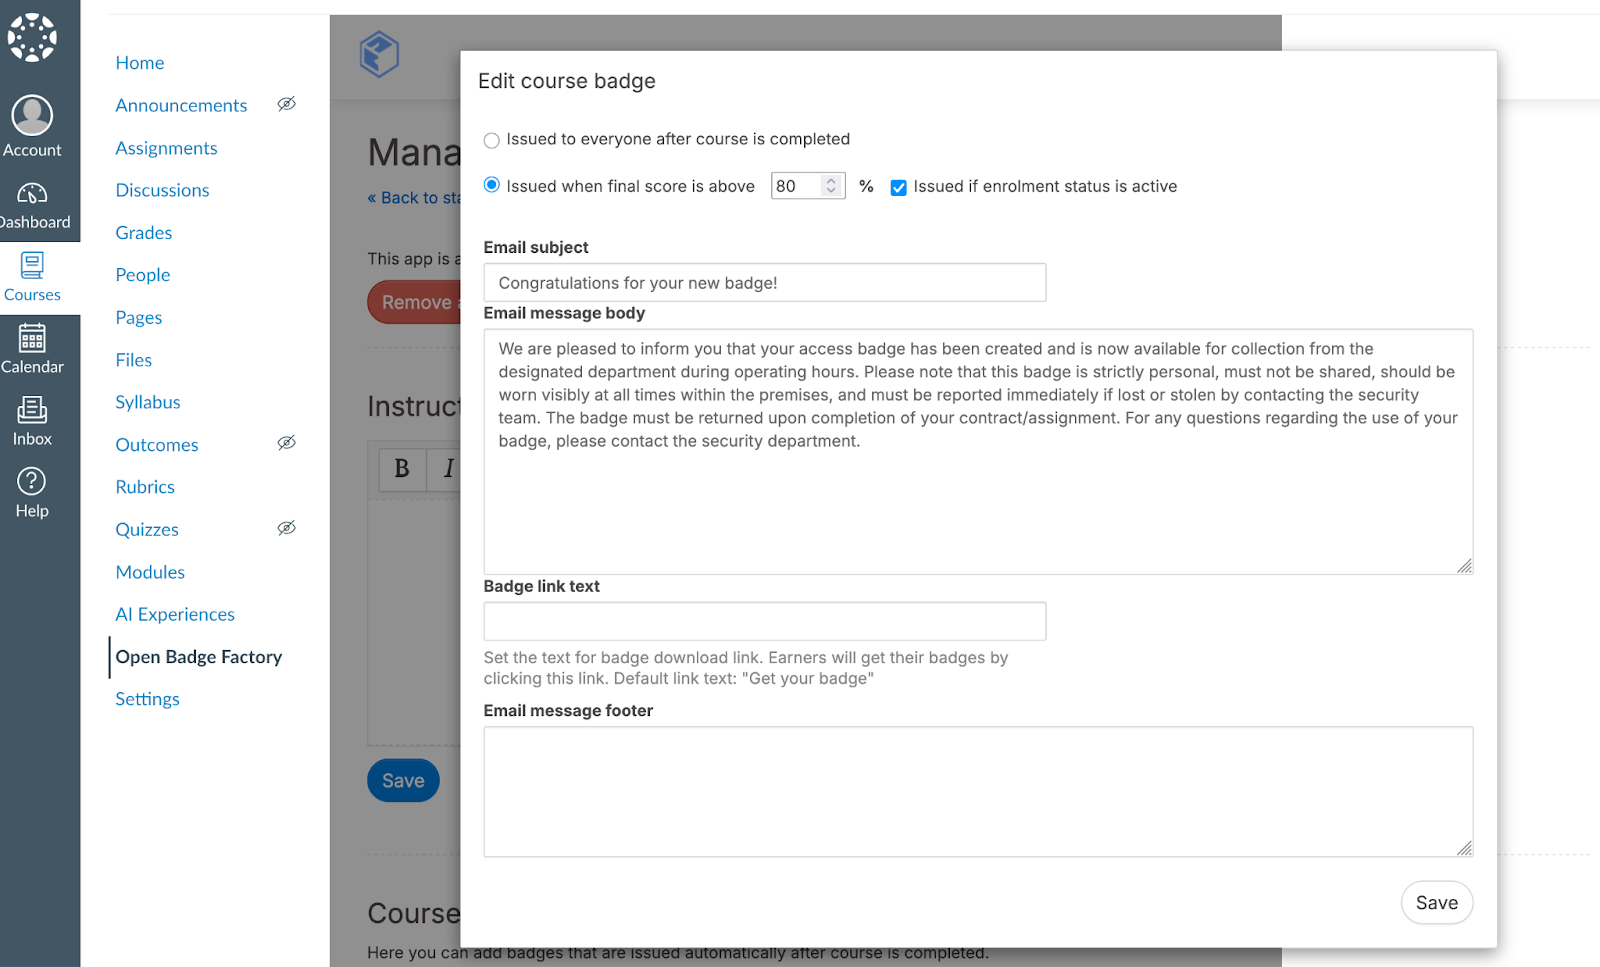
Tick the radio button “Issued when final score is above x %”.
Click “Save”.
Students will now be issued badges after the course concludes if they meet the final score requirement.
If you want to issue a badge based on the final score while the course is still active:
Check also the checkbox “Issued if enrollment status is active” before saving.
The system will check once a day if some students achieve this rule and will issue the badge.
The final score is based on the student’s course “Total” percentage.
- For active students, you can find the Total score under your course > Grades. By default, this shows the current score. To make the Total column show the final score for active students, tap "Treat Ungraded as 0s" on.
- For concluded students, you can find the Total score from your course > People > View Prior Users.
Adding badge applications for a course
In Canvas, go to Open Badge Factory via Course Navigation or the Module’s External Tool. Click Manage settings
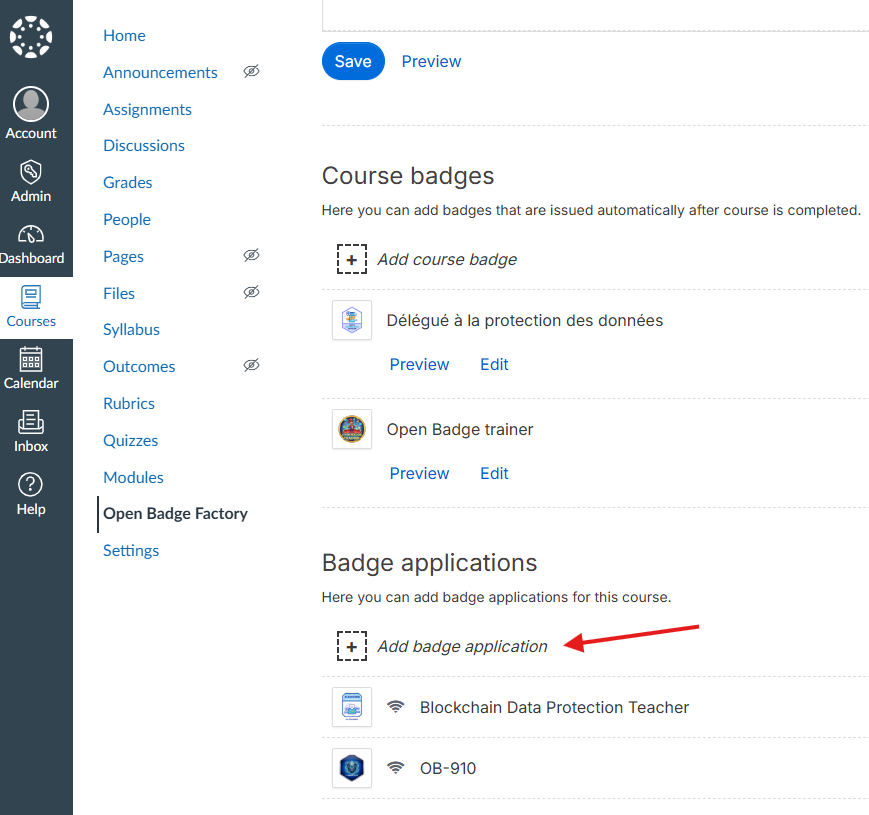
Click Add badge application
Select the badge application you want to add to the course
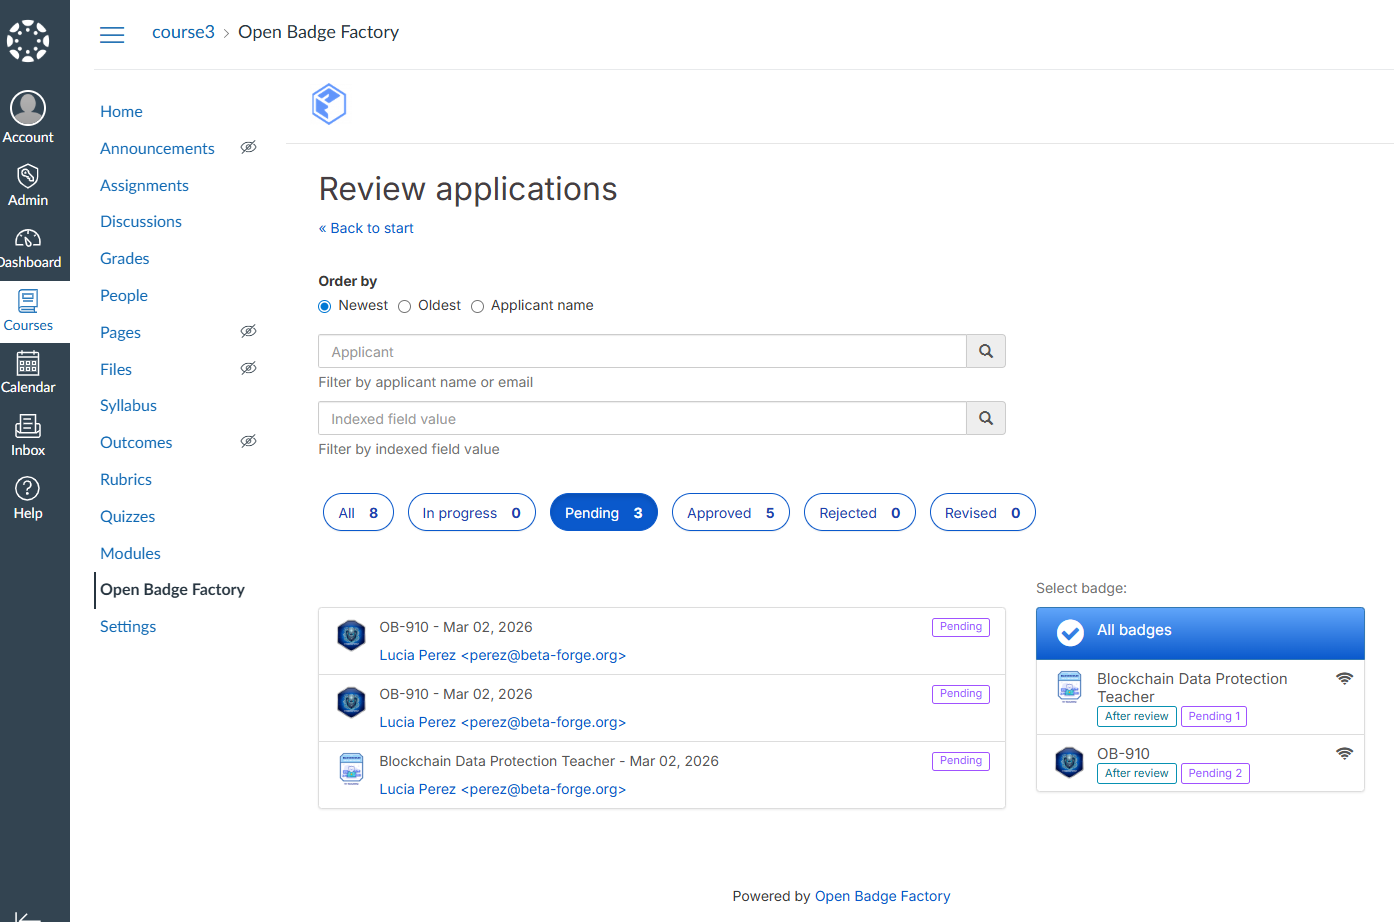
Reviewing badge applications
In Canvas, go to Open Badge Factory via Course Navigation or the Module’s External Tool. Click Review applications
Issuing history
In Canvas, go to Open Badge Factory via Course Navigation or the Module’s External Tool. Click Issuing history
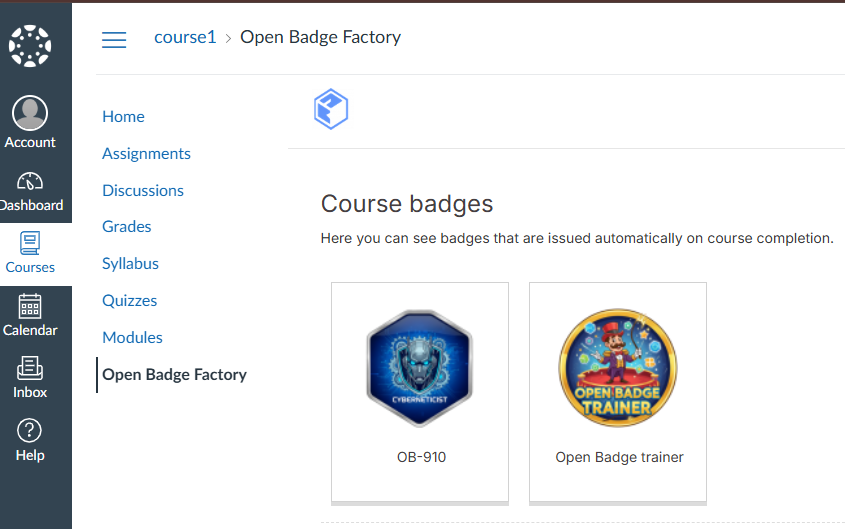
Student view
Students can view course badges and badge applications from the course via Course Navigation or the course module’s OBF External Tool.
Badge Issuance Behaviour
Automatic issuance (LTI rule-based)
Badge issuance via the Canvas LTI integration is not immediate. Issuance rules are checked once per night (nightly check). This means there may be a delay of up to 24 hours between course completion and badge issuance.
De-duplication rule
A badge will not be issued if the recipient's email address already holds one. This behaviour is systematic and acts as a built-in protection against duplicates.
Canvas course conclusion
If using automatic badge issuing and default settings, make sure the course has concluded. Courses are automatically concluded based on their end times.
Troubleshooting
"Failed to connect to service" Error
Symptom
Error message when launching the tool from Canvas. Students as well as teachers may encounter this error.
Explanation
The OBF LTI launch URL (https://openbadgefactory.com/ltiapp/
lti/) only works when launched from Canvas with a valid LTI 1.3 context. It
cannot be opened directly in a browser.
Solution
First, check that the user’s browser third-party cookies are enabled.
If enabling third-party cookies won’t solve the problem, verify the Canvas structure
- Go to Admin → Account → People
- Confirm the user belongs to the same account as the LTI installation
Badges Not Issued Automatically
Symptom
The badge is not issued automatically when a student completes the
course. Canvas course completion is determined by default by the course end date.
Solution
First, remember that badge issuance is not immediate and may take up to 24 hours.
If it has been over 24 hours, confirm the course concluded:
- Access the student's profile in Canvas
- Check Enrollments
- The course must show: "Completed, Enrolled as: Student"
If the student’s enrollment status is not marked as completed, automatic badge issuance will not be triggered, unless the “Issued if enrollment status is active” is checked for the badge.
Key takeaways
- All users must have third-party cookies enabled. Different browsers handle third-party cookies differently by default
- For automatic badge issuance to occur, the student’s course enrollment must be completed. By default, this happens when the course ends
- The LTI launch URL only works from Canvas, not directly in a browser
- Account alignment (LTI installation, course, user) is crucial for proper functioning
Need Additional Help?
If you encounter problems after checking all these points, contact OBF support with the following information:
- The user role and the browser used
- Description of the erroneous behaviour
- What was expected to happen?
- What happened instead?
- Screenshot(s) and error message(s)
Was this article helpful?
That’s Great!
Thank you for your feedback
Sorry! We couldn't be helpful
Thank you for your feedback
Feedback sent
We appreciate your effort and will try to fix the article